Google+ talkinginallcaps@gmail.com
  • Skip to primary navigation
  • Skip to main content
  • Skip to primary sidebar
  • Skip to footer

Talking in ALL CAPS

  • Food
    • 52 Salads Recipe Index
    • 52 Soups Recipe Index
  • Photography
  • Travel
    • Travel
    • US National Parks
    • Washington DC
    • Disneyland
  • Thoughts
    • Thoughts
    • Motherhood
    • Parenting
  • Calgary
  • About Me

feature

Why shop for it when you can swap for it? #shopswap

November 28, 2013 by danawyyc 1 Comment

shopswap2

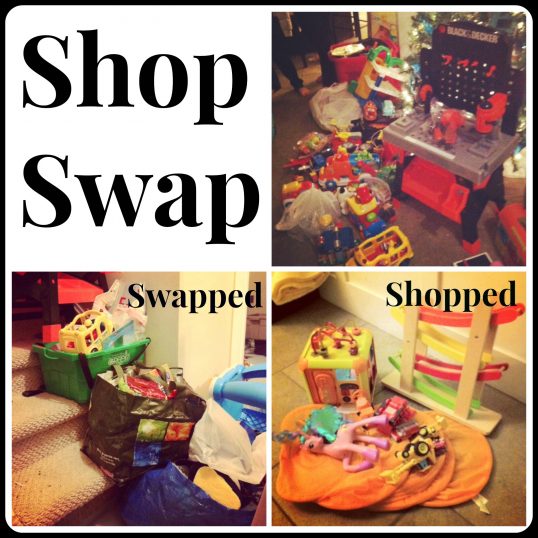
When you look at the comparison between what I swapped (what I brought) and what I shopped (what I went home with) you might think this was a pretty bad deal. But actually this was one of the best things I have done lately.

A few weeks ago, one of my friends proposed doing a toy swap. This could not have come at a better time for me. I have been in the process of decluttering – our house is small and we have been more or less using the basement as storage. As our family has gotten bigger we need to reclaim the basement as living space. One of the hardest things for me to cut down on has been the toys. I always wonder if maybe they will like the toy later even if they are not playing with it now, or maybe my daughter will like it even though my son didn’t. It was hard for me to get rid of things on behalf of my kids even though I don’t have a lot of trouble with my own things.

Having a deadline and a place to take all my things really helped. It forced me to sit down and take a hard look at the toys we had. I managed to whittle the toys down to the point where they fit our house as it is right now, not our house as we are hoping it will be in the future.

My main goal was to get rid of our extra toys and make our house more livable, but I was also looking forward to picking up a few new things up too. We had a pretty loose set up. We roughly organized the toys into different types and then we just picked what we wanted. No tickets or maximum number of tickets and no hard feelings. This saves a lot in terms of organization but does require everyone to be on board beforehand. It works best if everyone going is prepared to walk away with nothing and is only bringing toys that they just want to get rid of.

I found a few things that my kids are going to love and also won’t take up a lot of room. We are having a small Christmas this year so I decided to wrap up these toys for the kids’ Christmas presents. Although I might not shop exclusively at a Shop Swap next year, I would definitely pick up toys for Christmas again.

After the 7 of us had picked the toys we wanted to take home we still had a lot (a lot a lot) of toys left over. These toys were donated to WINS in Calgary (who will even pick up!)

You can read more about our Shop Swap experience at my friend Heather’s blog.


Filed Under: life Tagged With: feature

Taking Pictures of Kids in the Snow–Photo Tips

October 26, 2012 by danawyyc 3 Comments

Learning to Use my DSLR – Practical Photography Tutorials

Equipment Used in this Tutorial: Nikon D90, 18-105mm Lens

I had intended on doing my first tutorial on positioning yourself, your light source and your subject but instead it snowed a ton and was overcast. So instead, I decided I’ll try to figure out some tricks to improve my snow photographs. Which should come in super useful considering it is only the end of October.

After looking around, I found a three of suggestions that I thought I would try out: manipulating the exposure bias, white balance and the metering mode. The idea is that these will in turn make the snow less grey, make your photo less blue and make your camera more accurate when balancing the light by focusing on the subject rather than the whole scene.

The first thing that I had to do was set my camera to a programmable setting. On my Nikon D90 at least I can’t change the exposure bias on the auto setting.

Here’s a shot taken with the Auto setting:

Auto
Auto Setting

One of my Nikon photography books suggests that the Aperture Priority setting (shown on the camera below) would be appropriate if the scene is well lit which is was, so that’s what I used. Here’s one taken with the Aperture Priority setting before I changed any dials.
Aperature Priority
Aperture Priority Setting

I think the photo taken on the automatic setting looks a little better than the one taken with the Aperture Priority Setting but I was hoping to figure out how to improve upon that.

Exposure Bias: Making your snow look less grey

One of the difficulties with photographing snow, is that because everything is so white, your camera will try to balance this out by making the snow look grey. When you manipulate the exposure bias, you are either overexposing or underexposing your photos. For snow you want to over expose your photos a little bit by adjusting it to something like +1.

I tried this out in the photos below:

Aperature Priority Exposure -1
Exposure Bias 0                                        Exposure Bias -1

Exposure +1 Exposure Bias +2
Exposure Bias +1                                      Exposure Bias +2

I swear these are all separate photos. Nicole was a little surly about being outside in the snow. She has not found it to be very much fun so far. The first time we were out she tried to army crawl and got a face full of snow. She was not impressed.

Anyway, you can see the snow in the +1 exposure bias setting looks a lot whiter than the 0 or –1 setting. Even the +2 setting looks pretty good. You lose a lot of the definition in the snow but it makes for a striking photograph.

Here’s a couple more examples of manipulating the exposure bias:
0 Cloudy
Exposure Bias 0

1, Cloudy
Exposure Bias +1

0 Cloudy  1 Cloudy
Exposure Bias 0                                       Exposure Bias +1

I thought this change made a definite improvement in my photos. I would recommend giving it a try for sure.

White Balance – Making the snow look less blue

The second suggestion I decided to try was manipulating the white balance. Snow photos tend to have a blueish tinge and so either a flash or cloud setting was recommended to even that out. (Not that you want yellowy snow, just less blue).

In the first 3 photos below you can see what happened when I manipulated the white balance setting. In the last setting I compared them to one where I manipulated the exposure bias like I did above.

Aperature Priority Exposure Bias 0, White Balance Flash
Exposure Bias 0, White balance auto         Exposure Bias 0, White balance flash

Exposure Bias 0, White Balance Cloudy Exposure Bias 1, White Balance Auto
Exposure Bias 0, White balance cloudy       Exposure Bias +1 White balance auto

Although I can see differences between the white balance settings, I have a hard time picking out a winner. Manipulating the exposure bias made a much bigger difference in my photos. Based on these, I would probably only try manipulating the white balance if I was finding my photos were having a blue tinge.

Here’s another examples of manipulating the white balance, this time with the Exposure Bias adjusted to +1:

1 Auto
White Balance Auto

1 Cloudy
White Balance Cloudy

1 Flash
White Balance Flash

This time I think the colors in the cloudy setting might be a bit better.

Metering Mode – to let your camera better adjust the light levels

The auto setting for my camera is a matrix metering mode, where light information from the whole scene is used to determine the exposure of your photo. This can sometimes be problematic if the scene is too bright (as snow can often be) because your camera doesn’t know what you want to be the focus of your photograph. You can tell your camera to use a specific area of your photo to determine the exposure by using spot metering.

In the following three photos I tried out the three metering setting on my camera, Matrix, Center Weight and Spot:

AP Matrix, 0, Auto
Matrix Metering

AP, Metering - Center Weight AP, 0, Auto, Spot
Center Weight Metering                             Spot Metering

Here I think the Matrix Metering was the best. I suspect that Because it was overcast the snow wasn’t bright enough to make this manipulation worthwhile. It’s also worth noting that on my camera spot metering was the default in Aperture Priority mode so that probably accounts for why in my initial two photographs the one taken on the auto setting was a bit better.

Showing Off My New Skills

1 Auto
Exposure Bias +1, Auto White Balance

DSC_0461
Exposure Bias +1, White Balance Cloudy

How to Make the Adjustments

The instructions below are specific to the Nikon D90. Your camera may use different controls – I recommend searching for your camera and the control you want to manipulate on http://www.dummies.com or looking in your manual if you need more specific instructions on the controls for your camera.

d90-top_snowpics

d90-back_snowpics
Original Nikon D90 Photos by Nikon

1. Adjusting the Exposure Bias
Hold down the Exposure Bias button (+/-) on the top of the camera and use the scroll wheel to choose the exposure bias you want. You will see the setting in the display window on the top of your camera.

2. Adjusting the White Balance
Hold down the White Balance Button (WB) on the back of the camera and use the scroll wheel to choose the white balance you want. You will see the setting in the display window on the top of your camera. On my camera the Automatic setting is and A, the flash setting is a lightening bolt and the Cloud setting looks like a dark cloud.

3. Adjusting the Metering Mode
Hold down the Metering Mode Button on the top of the camera and use the scroll wheel to select the mode you want. will see the setting in the display window on the top of your camera. The single point mode looks like a single dot, centering weight is a dot surrounded by parentheses and matrix mode looks like a dot with a border around it.

Sources used for this article:

http://www.geofflawrence.com/snow.html

http://www.shotaddict.com/tips/article_Main+Things+To+Know+About+Winter+Shooting.html

http://www.dummies.com/how-to/content/understanding-all-the-nikon-d90s-controls.html

Nikon D3200 From Snapshots to Great Shots by Rob Sylvan

Filed Under: photography Tagged With: feature, slider

Primary Sidebar

About Me

I'm an experiential playground expert and mom to three young kids. I live with my husband in Calgary, Alberta, Canada. When I'm not looking after people, I'm reading all the YA fiction I can get my hands on and am attempting to learn photography. My laundry-folding suffers due to more interesting pursuits.

You can also find me over at:
12 Great Salads to Take to a Potluck or Feed a Big Group - talkinginallcaps.com

11 Great Salads to Take to a Potluck or Feed a Big Group

Sriracha tomato soup - easy meals - talkinginallcaps.com

12 Easy Meals That are Great for One or Two (or more!)

Asian Lentil and Mango Salad 3

Salad #49 – Asian Lentil and Mango Salad

Kale, Quinoa and Black Bean Salad

Salad #42 – Kale, Quinoa and Black Bean Salad

Disneyland Photography Tips - 11 Tips for Getting Great Photos Your Family Will Treasure

Disneyland Photography Tips – 11 Tips for Getting Great Photos of Your Disneyland Vacation

11 Tips for Taking a Toddler and a Preschooler to Disneyland

Categories

Archives

Footer

Copyright © 2025 · Foodie Pro Theme by Shay Bocks · Built on the Genesis Framework · Powered by WordPress