Google+ talkinginallcaps@gmail.com
  • Skip to primary navigation
  • Skip to main content
  • Skip to primary sidebar
  • Skip to footer

Talking in ALL CAPS

  • Food
    • 52 Salads Recipe Index
    • 52 Soups Recipe Index
  • Photography
  • Travel
    • Travel
    • US National Parks
    • Washington DC
    • Disneyland
  • Thoughts
    • Thoughts
    • Motherhood
    • Parenting
  • Calgary
  • About Me

Food

Eating Well and Losing Weight has Nothing to do with What You’re Not Eating

January 12, 2013 by danawyyc 1 Comment

I’m a far from perfect eater, and am definitely not as active as I should be, but weight loss has not been a major issue in my life. Pregnancy for most, and certainly for me, made weight gain and having to deal with weight loss inevitable.

When Nicole was 2 months old she was puking so much my doctor suggested I try going off dairy to see if it helped. (This is actually a pretty uncommon reason, but my son had a dairy sensitivity too. For most babies puking is not cause for concern and dairy is not the reason for the puking.)

Although I can’t say this made my day I thought that at least it would make it easier to lose the remaining baby weight. But it didn’t. After two months of not eating anything that had more than a ‘may contain dairy’ on the label, my weight had basically not changed. There was so many things that I wasn’t eating, cheese, lasagna, all kinds of desserts, most items at a buffet or pot luck, but that didn’t make a difference.

Because it’s not what you’re not eating that’s important. There are lots of ways to eat poorly without eating dairy, or sugar, or gluten or fat or whatever else you’re giving up. Cutting out dairy made me reach for more nuts and have more toast. And although there are fewer options, there are still plenty of desserts and sweets you can eat too. Having a restricted diet made it harder for me to make good choices because I simply had less to choose from.

If cutting something out of your diet helps you eat more fruits and vegetables and other healthy foods then it might help you lose weight. But that’s really what’s important,what you are eating.
Filed Under: Food

Surprisingly Easy Sponge Toffee Recipe–Dairy Free

January 10, 2013 by danawyyc 3 Comments

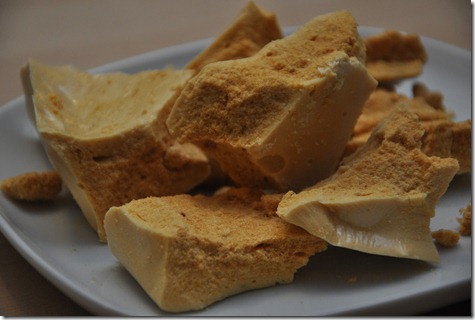
Surprisingly Easy Sponge Toffee Recipe

One day my husband suggested we try to make sponge toffee (think the inside of a crunchie bar. Neither of us had much experience making candy and we expected the process to be difficult.

Nothing could be further from the truth. It’s easy and quick to make and dairy free to boot. It’s also a pretty impressive looking science experiment to do with the kids. The candy is too hot for little kids to help with during the reaction, but older kids will love helping and younger kids will still be impressed.

Print
Surprisingly Easy Sponge Toffee Recipe–Dairy Free
 
Ingredients
  • 2.5 cups sugar
  • ⅔ cup corn syrup
  • ⅓ cup water
  • 4 tsp baking soda
  • 2 tsp vanilla
Instructions
  1. Grease and line a metal cake pan we used wax paper, but greased parchment paper is often recommended. (Do not be tempted to use a glass pan, you want something that has some bend to it).
  2. Get your baking soda and vanilla ready.
  3. Stir sugar, corn syrup and water in a 12 cup pot over medium heat until sugar dissolves.
  4. Put in a candy thermometer. Do not stir while you wait for it to come to a boil.
  5. When the temperature reaches 300F (hard crack stage) remove it from heat.
  6. Quickly whisk in the baking soda. This will cause the mixture to bubble up (you’ll want your kids who are not actively helping to stay back – it’s hot!)
  7. Whisk in the vanilla.
  8. Immediately pour into the prepared pan. Let it cool in the pan for about 2 hours. The mixture may be kind of uneven on top but resist the urge to smooth it out, that will pop the air bubbles.
  9. Break it into pieces and enjoy!
3.2.2925

Filed Under: desserts and treats, Food, Recipes, Vegan, Vegetarian Tagged With: dessert, treats

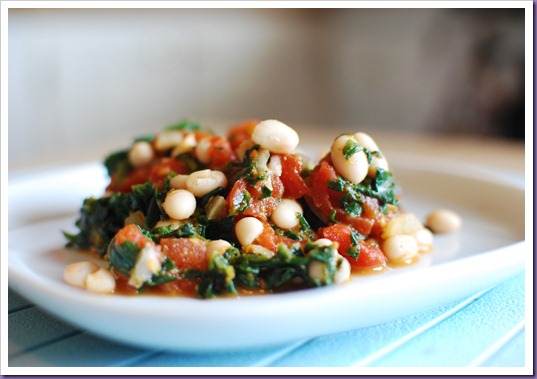
Dead Simple Suppers: Indian Spiced Beans and Spinach

June 26, 2012 by danawyyc Leave a Comment

I love the combination of beans and tomatoes. I especially love recipes like this one, where I can have all the ingredients I need just waiting in the cupboard (and freezer) for a day when I’ve forgotten to plan dinner. You can use this as the main dish by adding a bun or some rice to the side – it would also be nice on top of some pasta or couscous. Or you can make it a nutritious side dish instead and serve it with sausage or chicken.

Dead Simple Suppers: Indian Spiced Beans and Spinach

Print
Dead Simple Suppers: Indian Spiced Beans and Spinach
 
(adapted from Rachel Ray Magazine)
Ingredients
  • 1 Tbsp canola oil
  • 1 onion chopped
  • 1 large can of diced tomatoes (28 oz)
  • 3 tsp ground coriander
  • 1.5 tsp ground cumin
  • ¼ tsp garam masala
  • ¼ tsp tumeric
  • 1 can of beans rinsed and drained (the original recipe called for chickpeas, I used navy beans)
  • salt
  • 1 package of chopped frozen spinach
Instructions
  1. Heat the oil in a large skillet over medium high heat.
  2. Add chopped onion and cook for a few until slightly browned on the edges.
  3. Add the spices, and tomatoes and frozen spinach. Cook until spinach is almost completely thawed. (If using chickpeas you can add them now too as they are more robust than navy beans).
  4. Add beans and cook until heated through.
3.2.2925

Indian Spiced Beans and Spinach

(adapted from Rachel Ray Magazine)

Ingredients

  • 1 Tbsp canola oil
  • 1 onion chopped
  • 1 large can of diced tomatoes (28 oz)
  • 3 tsp ground coriander
  • 1.5 tsp ground cumin
  • 1/4 tsp garam masala
  • 1/4 tsp tumeric
  • 1 can of beans rinsed and drained (the original recipe called for chickpeas, I used navy beans)
  • salt
  • 1 package of chopped frozen spinach

Directions

  1. Heat the oil in a large skillet over medium high heat.
  2. Add chopped onion and cook for a few until slightly browned on the edges.
  3. Add the spices, and tomatoes and frozen spinach. Cook until spinach is almost completely thawed. (If using chickpeas you can add them now too as they are more robust than navy beans).
  4. Add beans and cook until heated through.

Filed Under: Easy Meals, Food, Recipes, Vegan, Vegetarian

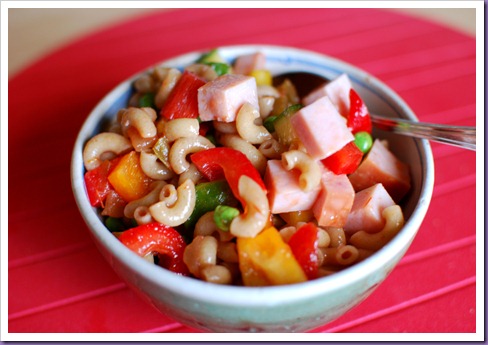
Dead Simple Supper: Salsa Pasta Salad

June 20, 2012 by danawyyc 1 Comment

Now that I have two kids, I’m finding it even more difficult to get a healthy dinner on the table. When I’m sleep deprived, I lack both imagination and enthusiasm in the kitchen. On top of this both my kids are having problems with milk and many of my go to easy meals rely on cheese.To assist me in avoiding takeout and providing my family with nutritious meals without a lot of effort, I’ve decided to blog about some dead simple suppers to help give me inspiration while meal planning or (more likely) while trying to figure out what on earth we’re going to have for supper tonight.

Salsa Pasta Salad Recipe

DSC_0160

Ingredients

  • 1 package of macaroni or other whole wheat noodles
  • 1/4 of a small precooked ham cubed
  • 2 bell peppers (any color) chopped
  • 1 cucumber chopped
  • handful of frozen peas
  • Salsa

“Directions”

  1. Cook pasta until al dente and cool under cold water.
  2. Put in a large bowl along with vegetables and ham (the peas can go in frozen).
  3. Add salsa just to coat and mix well. Add salt and pepper to taste.
  4. Serve cold or room temperature.
If you’re feeling more ambitious, try this pasta salad recipe from my friend Heather’s blog. It’s perfect for the summer when you’re looking for something light that doesn’t require a lot of cooking.

Filed Under: Easy Meals, Food, Recipes

Construction Site Birthday Cake

April 16, 2012 by danawyyc Leave a Comment


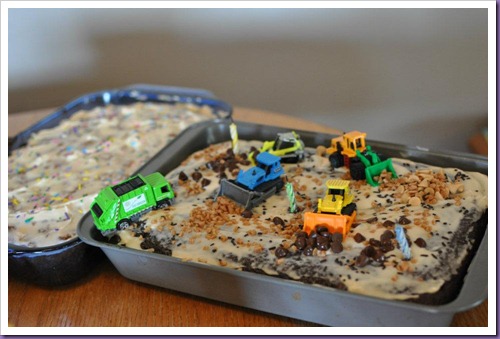
My little boy is now three. Where did the time go? I wanted to make him a special cake, but I have no real cake decorating ability (or any patience to try acquire it). I saw a cake similar to this one in a picture on pinterest but unfortunately the photo didn’t link anywhere 🙁 Gordie told me that the best part of his birthday was the machines from the cake. It was definitely a hit!

digger cake

I used a basic butter cream icing with peanut butter but any kind would do. I put it on the cake before it had finished cooling so that’s why it’s a little bit melty.

I found the machines at Walmart, they’re Matchbox brand and were only a little over a dollar each.

I used skor bits, chocolate chips and peanut butter chips.For the piles of dirt and rocks. I was thinking some kind of crushed up cookies or oreo crumbs would be great too.

Filed Under: Food Tagged With: birthday cake

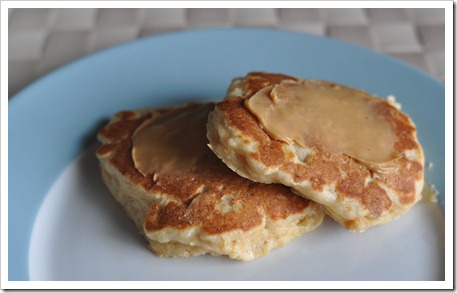
Peanut Butter Banana Yogurt Pancakes

October 11, 2011 by danawyyc Leave a Comment

Our pancake kick continued, but the blueberries we used in our previous recipe didn’t last. So I thought I’d try a new modification. I love peanut butter and these pancakes are fantastic. A little skiff of peanut butter on top while they are still warm makes them even better. They’d also make an awesome peanut butter and banana sandwich.

Peanut Butter Banana Yogurt Pancakes

Print
Peanut Butter Banana Yogurt Pancakes
 
(Adapted from Bed & Breakfast Inns Online)
Ingredients
  • 1 Cup Flour
  • 1 Tablespoon Sugar
  • 1 Teaspoon Baking Soda
  • ½ Teaspoon Salt
  • ¼ cup Peanut Butter
  • 2 Large Eggs
  • 1 Cup Plain Yogurt (Balkan is nice)
  • 1 Ripe Banana Mashed
  • 2 Tablespoons Butter, Melted
Instructions
  1. Mix dry ingredients in a medium sized bowl.
  2. Add the peanut butter to the dry ingredients and mix well. It’ll have a crumbly texture when it’s In a large bowl, beat eggs, add yogurt, melted butter and mash in the banana. You can do this by breaking it into pieces and then mashing it up with the whisk or you can mash them first. They need to be small but do not need to be completely mashed. If you hate mashing you could even just slice them thinly.
  3. Add the dry ingredients to the wet (half the time I do this backwards, but this way you don’t have flour mixture stuck to the bottom). Mix just enough so that you no longer see any dry flour.
  4. Cook the pancakes on a medium-high heat for about 2 minutes per side. If you haven’t cooked them before try doing a test pancake before making a whole bunch
3.2.2925

.

Filed Under: Easy Meals, Food, Recipes, Vegetarian

Blueberry Banana Yogurt Pancakes

October 4, 2011 by danawyyc 3 Comments

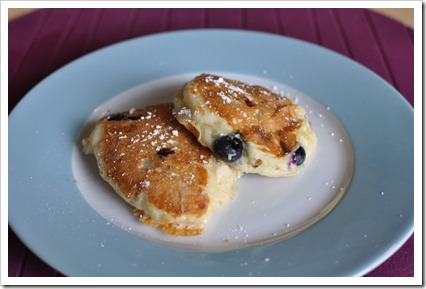
I almost never make pancakes. I made some off hand comment that used the word pancakes (what on earth could that be? I cannot for the life of me figure out how you use the word pancakes without saying something like “let’s have pancakes”). Regardless, Gordie thought this was the best idea he had ever heard. I managed to get out of making pancakes for lunch but promised he could have them for dinner.

I put this together so I could feel like even though we were having pancakes for dinner, we were getting some decent nutrition too. Whole wheat pancakes always seem to be lacking something so I decided to add things to the pancakes instead. Plain yogurt, a banana and blueberries make these a lot more nutrient dense than your average pancake as well as sweet and moist.

Blueberry Banana Yogurt Pancakes

Print
Blueberry Banana Yogurt Pancakes
 
(Adapted from Bed & Breakfast Inns Online)
Ingredients
  • 1 Cup Flour
  • 1 Tablespoon Sugar
  • 1 Teaspoon Baking Soda
  • ½ Teaspoon Salt
  • 2 Large Eggs
  • 1 Cup Plain Yogurt (Balkan is nice)
  • 1 Ripe Banana Mashed
  • 2 Tablespoons Butter, Melted
  • 2 Handfuls of Blueberries
Instructions
  1. Mix dry ingredients in a medium sized bowl.
  2. In a large bowl, beat eggs, add yogurt, melted butter and mash in the banana. You can do this by breaking it into pieces and then mashing it up with the whisk or you can mash them first. They need to be small but do not need to be completely mashed. If you hate mashing you could even just slice them thinly.
  3. Add the dry ingredients to the wet (half the time I do this backwards, but this way you don’t have flour mixture stuck to the bottom). Mix just enough so that you no longer see any dry flour.
  4. Add the blueberries and gently fold them in.
  5. Cook the pancakes on a medium-high heat for about 2 minutes per side. If you haven’t cooked them before try doing a test pancake before making a whole bunch.
3.2.2925


Filed Under: Easy Meals, Food, Recipes, Vegetarian

Easy Roasted Beets

September 30, 2011 by danawyyc 1 Comment

I starting making these when we had a community garden plot. I had planted things like beets and turnips that I read grown well in Siberia. I figured it they grew well there, I  shouldn’t have a problem. And it totally worked, they were awesome. This year, I tried a square foot garden and had no luck whatsoever with my beets or turnips. I’m not entirely sure why, but if you had more luck than I did, this recipe is great.

Easy Roasted Beets

Print
Easy Roasted Beets
 
Ingredients
  • Beets trimmed and washed
  • Extra virgin olive oil
  • Balsamic vinegar
  • Freshly ground pepper
  • Aluminum foil
Instructions
  1. Preheat oven to 400F.
  2. Line a baking tray and wrap each beet with aluminum foil.
  3. Roast beets for approximately 40 minutes. Longer if you have big beets, less if you have small beets.
  4. When the beets are cooked through, take them out of the oven. I recommend covering your hands when you work with the beets, gloves are good, but I hate now they make my hands smell so I usually just use two sandwich sized ziplock bags.
  5. Peel the beets. If the beets have been cooked long enough, the skin should slide right off with your fingers.
  6. Cut each beet in half and then slice into half moons. It looks pretty to have full circles but the beets can be pretty slippery. Halving them first can really save your fingers.
  7. Put the beets into a bowl and toss with the olive oil, vinegar and pepper. If you think they need a bit more flavor, add more vinegar. You only need enough olive oil to coat and the pepper can get to be too much pretty quickly.
3.2.2925


Note: Beets contain quite a lot of natural dye. When you eat them this goes through your body with predictable purple/red results. This is perfectly harmless but can look a little alarming if you are not prepared. 🙂

Filed Under: Food, Recipes, Side Dishes, Vegan, Vegetarian

Chocolate Quinoa Cake: The Cake I Couldn’t Kill Even Though I Tried

May 28, 2011 by danawyyc 4 Comments

I didn’t set out to try and kill this cake. I decided to make it for my birthday. People made fun of my when I made grilled angel food cake with balsamic vinegar, fresh pepper and cut up strawberry topping for Gordie’s first birthday cake  (he just ate the topping)  but I figured I’d get a free pass to try something different on my birthday. Which actually I did.
Somehow though even though I can usually follow a recipe, I managed to:

  1. not let the Quinoa cool before I tried to put it in the food processor with the wet ingredients.
  2. not let the Quinoa/wet ingredient mixture cool before i mixed it with the dry ingredients (even though I had noticed that I should have let it cool already)
  3. Put the cake in the oven and then remember that I had read the word butter, but had not in fact touched any butter.
  4. Took the two cake pans out of the oven (after only 4 or 5 minutes) and poured in  75% canola 25% melted butter into the two pans and stirred it around a little bit.

I had also managed to mess up my icing by putting in the food processor instead of using my hand mixer and then adding way to much milk. This predictably made it a lot soupier than I had intended. I have no idea what possessed me. But let’s face it, it’s basically sugar and butter, it still tasted good.
Chocolate Quinoa Cake: The Cake I Couldn’t Kill Even Though I Tried
The cake was more of a surprise. Although a chunk of it did break off when I took it out of the pan and tried to peel the parchment paper off, it was delicious. I almost gave up on it after I made so many mistakes, but clearly this is a robust recipe which can take a bit of abuse. It’s definitely a dense cake rather than fluffy, but it is moist and no one could guess it was Quinoa if they didn’t already know. And it is super chocolaty tasting.
I would definitely make it again and honestly, wouldn’t even bother with the icing.

Print
Chocolate Quinoa Cake: The Cake I Couldn’t Kill Even Though I Tried
 
(adapted from Quinoa 365: The Everyday Superfood)
Ingredients
  • ⅔ cup quinoa (I didn’t rinse mine but they recommend it)
  • 1⅓ cup water
  • ⅓ cup milk
  • 4 large eggs
  • 1 tsp vanilla extract
  • ¾ cup butter melted and cooled (oh, oops again)
  • 1½ cups sugar
  • 1 cup cocoa powder
  • 1½ tsp baking powder
  • ½ tsp baking soda
  • ½ tsp salt
Instructions
  1. Bring Quinoa and water to a boil in a medium-sized saucepan. Cover, reduce temperature to low and cook for 10 minutes. Take it off the heat and let it sit for another 10 minutes with the lid on. (I don’t find a difference between leaving it on the burner with the heat off and just taking it off the heat). Or you can just cook the Quinoa according to the package instructions.
  2. Next, take the lid off and fluff with a fork. Let the Quinoa cool. And by that I mean actually get to room temperature instead of leaving it for 30 seconds and moving on to the next step like I did.
  3. Preheat the oven to 350F. Line two 8 inch square or round cake pans with parchment paper. (I ended up using 8x8 square pan and a large loaf pan, so you can probably use what you like just make sure you do a good toothpick test).
  4. Combine the milk, eggs and vanilla in a blender or food processor. Add the butter and two cups of cooked Quinoa (I definitely did not measure this, I just used what all of what was cooked, it should be right anyway) and blend until smooth. (you could still see a lot of the individual quinoa when I stopped blending, but it wasn’t getting any smoother and was at least consistent in texture).
  5. Mix the dry ingredients (sugar, cocoa, baking powder, baking soda and salt in a medium bowl. Add the wet ingredient/Quinoa mixture and mix well.
  6. Divide into your two pans and bake on the centre rack of your oven for 40-45 minutes or until a toothpick comes out clean.
  7. Let the cake cool completely before serving.
  8. Store amazingly well in a sealed container in the fridge. Honestly the leftovers were just about as good as fresh. You can also freeze it but I haven’t tried that myself.
3.2.2925


Filed Under: desserts and treats, Food, Recipes Tagged With: cake, dessert

BBQ Chicken Enchiladas

May 3, 2011 by danawyyc 4 Comments

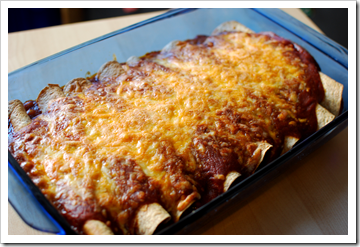
I decided to try out this Enchilada recipe from Feels Like Home for my brother’s birthday dinner. I’m pretty sure the best time to try out a new recipe is at a special occasion for a bunch of people right? Normally we would get take out, but we still haven’t found a chinese food place we like in our neighbourhood and half the family finds Indian too spicy. At the last minute I decided I’d just make these Enchiladas.  Ill-advised or not, it was awesome.

I dialled back the spices from the original recipe to accommodate our family heat wimps. They found it to be spicy but at a level they (and Gordie) could easily handle. If you are looking for something spicy, you’ll want to amp up the spices, but it’s nice and flavorful (if not hot) as written below).

I made my own Enchilada sauce which allows me to control the level of spice and fat but you could easily use the bottled stuff instead.

BBQ Chicken Enchiladas

Print
Enchilada Sauce Recipe
 
(adapted from Feels Like Home)
Ingredients
  • ¼ cup vegetable oil
  • 3 tablespoons flour
  • 1.5 tablespoons chili powder
  • 1 16-oz can tomato sauce
  • chicken broth
  • 1 teaspoon ground cumin
  • 3-4 cloves garlic, minced
  • 1 teaspoon onion powder
  • salt
Instructions
  1. Add the oil to a pan over medium heat. When the oil is hot, stir in the flour and chili powder. Use a whisk (this will help prevent lumps in your sauce) to stir constantly under it starts to brown (a minute or two)
  2. Continue to stir as you add the remaining ingredients. Cook until sauce begins to thicken – about 10 minutes. If you are wanting to speed things up you can bring the sauce to a boil for a minute or two and the sauce will thicken a bit quicker.
3.2.2925

BBQ Chicken Enchiladas
Print
BBQ Chicken Enchiladas
 
(adapted from Feels Like Home)
Ingredients
  • ½ cup BBQ sauce (plus 2 tbsp) (I used Kraft original)
  • meat from 1 roasted chicken or 1.5 pounds of boneless chicken, cooked and shredded
  • 1 medium onion, chopped
  • 2 cup of shredded cheese
  • 8 whole wheat tortillas (I have also managed 10, but 8 is more reasonable)
Instructions
  1. Preheat oven to 375F.
  2. Add the BBQ sauce to the enchilada sauce and stir.
  3. Add a little oil to a second pan and saute the chopped onion until it softens. Add the chicken, and a couple tablespoons of the BBQ sauce. Cook for a couple more minutes and then add ½ a cup of the enchilada sauce and 1 cup of the shredded cheese. Mix well and cook until the cheese is melted.
  4. Add a layer of the enchilada sauce to a 9x13 baking dish.
  5. Add a big scoop of the chicken mixture to a tortilla, and roll it. Place it in the baking dish seam side down. Continue until all your tortillas have been filled. If you are running out of space it is totally okay to squish your tortillas together so you can fit more in.
  6. Pour the rest of the enchilada sauce over the rolled tortillas and top with the last cup of cheese.
  7. Bake for about 25 minutes. The cheese and sauce should be hot and bubbly.
3.2.2925

So, Did They Eat It?

This was a huge hit. I served this with a fried rice and a black bean salad to 11 people. I cut each of the enchiladas in half so it was easier for people to take just how much they wanted. Everyone from my toddler to my grandparents and my spice sensitive inlaws  enjoyed it. The BBQ sauce really helps give it some extra flavor without the extra heat. I will be making this again for sure, although I may add some extra chili powder if it’s just for us.

Filed Under: Chicken, Easy Meals, Food, Recipes

« Previous Page
Next Page »

Primary Sidebar

About Me

I'm an experiential playground expert and mom to three young kids. I live with my husband in Calgary, Alberta, Canada. When I'm not looking after people, I'm reading all the YA fiction I can get my hands on and am attempting to learn photography. My laundry-folding suffers due to more interesting pursuits.

You can also find me over at:
12 Great Salads to Take to a Potluck or Feed a Big Group - talkinginallcaps.com

11 Great Salads to Take to a Potluck or Feed a Big Group

Sriracha tomato soup - easy meals - talkinginallcaps.com

12 Easy Meals That are Great for One or Two (or more!)

Asian Lentil and Mango Salad 3

Salad #49 – Asian Lentil and Mango Salad

Kale, Quinoa and Black Bean Salad

Salad #42 – Kale, Quinoa and Black Bean Salad

Disneyland Photography Tips - 11 Tips for Getting Great Photos Your Family Will Treasure

Disneyland Photography Tips – 11 Tips for Getting Great Photos of Your Disneyland Vacation

11 Tips for Taking a Toddler and a Preschooler to Disneyland

Categories

Archives

Footer

Copyright © 2025 · Foodie Pro Theme by Shay Bocks · Built on the Genesis Framework · Powered by WordPress