Google+ talkinginallcaps@gmail.com
  • Skip to primary navigation
  • Skip to main content
  • Skip to primary sidebar
  • Skip to footer

Talking in ALL CAPS

  • Food
    • 52 Salads Recipe Index
    • 52 Soups Recipe Index
  • Photography
  • Travel
    • Travel
    • US National Parks
    • Washington DC
    • Disneyland
  • Thoughts
    • Thoughts
    • Motherhood
    • Parenting
  • Calgary
  • About Me

desserts and treats

Haystacks – Cornflake and Toffee No Bake Cookies

August 15, 2018 by danawyyc 1 Comment

Haystacks No Bake Cookie - talkinginallcaps.com

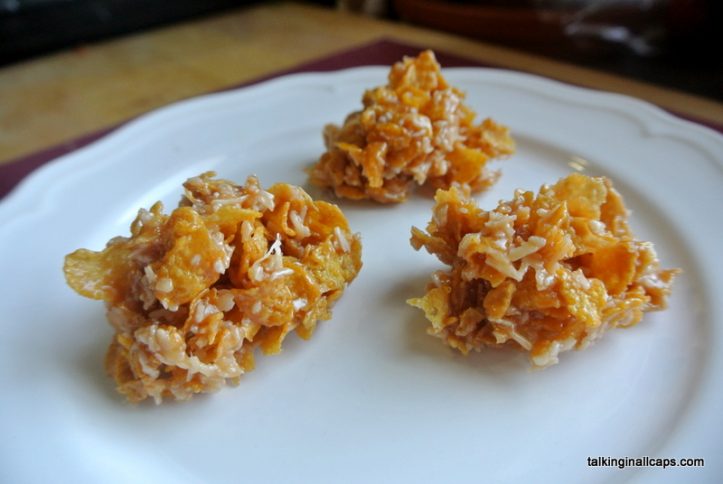
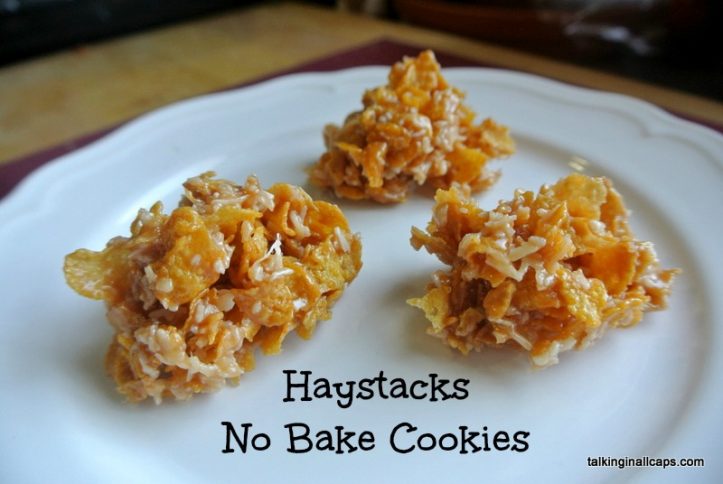
One of my favorite treats growing up was my Auntie Betty’s haystacks. I got the recipe from her a few years ago, but I only made them this year after seeing my friend Merry’s similar recipe for No Bake Peanut Butter Crunchies. Not only were they as good as I remembered they were actually super easy to make too. After eating a few, okay a lot. I made another 2 batches to share with our neighbors.

Haystacks No Bake Cookie - talkinginallcaps.com

Print
Haystacks - Cornflake and Toffee No Bake Cookie
 
Ingredients
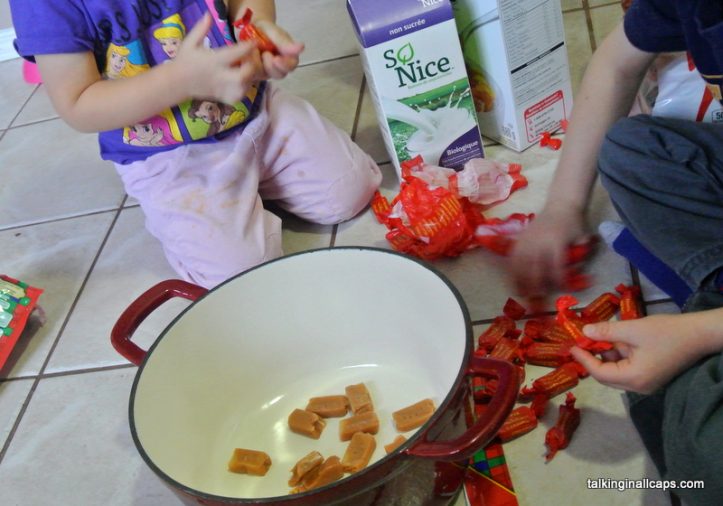
  • 225g of toffee bars (McIntosh) or caramels (approximately 1 bag or 4 bars)
  • 1 cup coconut
  • 3 cups cornflakes
  • 2-4 Tbsp milk
Instructions
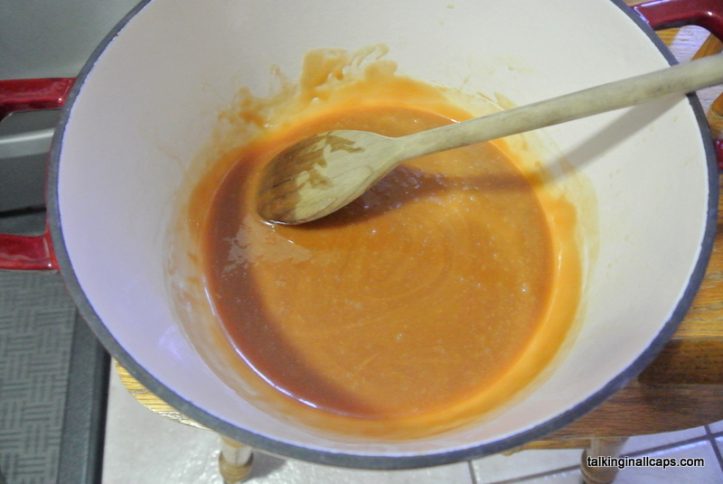
  1. ) Melt toffee and milk over low heat stirring often
  2. ) When melted add coconut and corn flakes
  3. ) Mix well and drop spoonfuls onto wax paper
  4. Don't worry if the haystacks look a little loose, when they cool they will set into one piece.
3.2.2925

Haystacks No Bake Cookie - talkinginallcaps.com

Haystacks No Bake Cookie - talkinginallcaps.com

Filed Under: desserts and treats, Food, Recipes

Butter Tarts

January 11, 2018 by danawyyc Leave a Comment

We love butter tarts and like to try different versions to try to find the best one. One day we decided to make our own and to date they are still our favourites.

Ingredients

2 eggs

1.5 cups brown sugar

0.5 cup maple syrup

3 TBSP melted butter

1 cup raisins

2 tsp vinegar

pinch of salt

1/2 tsp vanilla extract

24 tart shells (3″)

Directions

  1. Before cooking, soak raisins in boiling water for hours or overnight. Add a tablespoon or two or rum, rye or vinegar for added flavour. (This step is optional if you are short on time but it’s worth it).
  2. Preheat oven 350F
  3. Beat eggs well in a large bowl.
  4. Add sugar, syrup and melted butter to the eggs. Mix well.
  5. Add vinegar, salt and vanilla.
  6. Drain the liquid from the raisins. Fill the bottom of the tart shells with raisins.
  7. Fill the tart shells 3/4 full with the sugar mixture. I find a small liquid measuring cup works well.
  8. Bake for 22-25 minutes or until set. The tart shells should be lightly browned and the filling should stay put if tipped.

Variations:
Skip the raisins and full the tarts just with the sugar mixture.
Add toasted, chopped pecans to the top of the tarts before cooking.
Add sea salt to the top of the tarts before or after cooking.

Filed Under: desserts and treats, Food, Recipes

Surprisingly Easy Sponge Toffee Recipe–Dairy Free

January 10, 2013 by danawyyc 3 Comments

Surprisingly Easy Sponge Toffee Recipe

One day my husband suggested we try to make sponge toffee (think the inside of a crunchie bar. Neither of us had much experience making candy and we expected the process to be difficult.

Nothing could be further from the truth. It’s easy and quick to make and dairy free to boot. It’s also a pretty impressive looking science experiment to do with the kids. The candy is too hot for little kids to help with during the reaction, but older kids will love helping and younger kids will still be impressed.

Print
Surprisingly Easy Sponge Toffee Recipe–Dairy Free
 
Ingredients
  • 2.5 cups sugar
  • ⅔ cup corn syrup
  • ⅓ cup water
  • 4 tsp baking soda
  • 2 tsp vanilla
Instructions
  1. Grease and line a metal cake pan we used wax paper, but greased parchment paper is often recommended. (Do not be tempted to use a glass pan, you want something that has some bend to it).
  2. Get your baking soda and vanilla ready.
  3. Stir sugar, corn syrup and water in a 12 cup pot over medium heat until sugar dissolves.
  4. Put in a candy thermometer. Do not stir while you wait for it to come to a boil.
  5. When the temperature reaches 300F (hard crack stage) remove it from heat.
  6. Quickly whisk in the baking soda. This will cause the mixture to bubble up (you’ll want your kids who are not actively helping to stay back – it’s hot!)
  7. Whisk in the vanilla.
  8. Immediately pour into the prepared pan. Let it cool in the pan for about 2 hours. The mixture may be kind of uneven on top but resist the urge to smooth it out, that will pop the air bubbles.
  9. Break it into pieces and enjoy!
3.2.2925

Filed Under: desserts and treats, Food, Recipes, Vegan, Vegetarian Tagged With: dessert, treats

Chocolate Quinoa Cake: The Cake I Couldn’t Kill Even Though I Tried

May 28, 2011 by danawyyc 4 Comments

I didn’t set out to try and kill this cake. I decided to make it for my birthday. People made fun of my when I made grilled angel food cake with balsamic vinegar, fresh pepper and cut up strawberry topping for Gordie’s first birthday cake  (he just ate the topping)  but I figured I’d get a free pass to try something different on my birthday. Which actually I did.
Somehow though even though I can usually follow a recipe, I managed to:

  1. not let the Quinoa cool before I tried to put it in the food processor with the wet ingredients.
  2. not let the Quinoa/wet ingredient mixture cool before i mixed it with the dry ingredients (even though I had noticed that I should have let it cool already)
  3. Put the cake in the oven and then remember that I had read the word butter, but had not in fact touched any butter.
  4. Took the two cake pans out of the oven (after only 4 or 5 minutes) and poured in  75% canola 25% melted butter into the two pans and stirred it around a little bit.

I had also managed to mess up my icing by putting in the food processor instead of using my hand mixer and then adding way to much milk. This predictably made it a lot soupier than I had intended. I have no idea what possessed me. But let’s face it, it’s basically sugar and butter, it still tasted good.
Chocolate Quinoa Cake: The Cake I Couldn’t Kill Even Though I Tried
The cake was more of a surprise. Although a chunk of it did break off when I took it out of the pan and tried to peel the parchment paper off, it was delicious. I almost gave up on it after I made so many mistakes, but clearly this is a robust recipe which can take a bit of abuse. It’s definitely a dense cake rather than fluffy, but it is moist and no one could guess it was Quinoa if they didn’t already know. And it is super chocolaty tasting.
I would definitely make it again and honestly, wouldn’t even bother with the icing.

Print
Chocolate Quinoa Cake: The Cake I Couldn’t Kill Even Though I Tried
 
(adapted from Quinoa 365: The Everyday Superfood)
Ingredients
  • ⅔ cup quinoa (I didn’t rinse mine but they recommend it)
  • 1⅓ cup water
  • ⅓ cup milk
  • 4 large eggs
  • 1 tsp vanilla extract
  • ¾ cup butter melted and cooled (oh, oops again)
  • 1½ cups sugar
  • 1 cup cocoa powder
  • 1½ tsp baking powder
  • ½ tsp baking soda
  • ½ tsp salt
Instructions
  1. Bring Quinoa and water to a boil in a medium-sized saucepan. Cover, reduce temperature to low and cook for 10 minutes. Take it off the heat and let it sit for another 10 minutes with the lid on. (I don’t find a difference between leaving it on the burner with the heat off and just taking it off the heat). Or you can just cook the Quinoa according to the package instructions.
  2. Next, take the lid off and fluff with a fork. Let the Quinoa cool. And by that I mean actually get to room temperature instead of leaving it for 30 seconds and moving on to the next step like I did.
  3. Preheat the oven to 350F. Line two 8 inch square or round cake pans with parchment paper. (I ended up using 8x8 square pan and a large loaf pan, so you can probably use what you like just make sure you do a good toothpick test).
  4. Combine the milk, eggs and vanilla in a blender or food processor. Add the butter and two cups of cooked Quinoa (I definitely did not measure this, I just used what all of what was cooked, it should be right anyway) and blend until smooth. (you could still see a lot of the individual quinoa when I stopped blending, but it wasn’t getting any smoother and was at least consistent in texture).
  5. Mix the dry ingredients (sugar, cocoa, baking powder, baking soda and salt in a medium bowl. Add the wet ingredient/Quinoa mixture and mix well.
  6. Divide into your two pans and bake on the centre rack of your oven for 40-45 minutes or until a toothpick comes out clean.
  7. Let the cake cool completely before serving.
  8. Store amazingly well in a sealed container in the fridge. Honestly the leftovers were just about as good as fresh. You can also freeze it but I haven’t tried that myself.
3.2.2925


Filed Under: desserts and treats, Food, Recipes Tagged With: cake, dessert

Sometimes Food Tastes Like Love: Chocolate Peanut Butter Marshmallow Pitas

April 22, 2011 by danawyyc 2 Comments

You may have noticed that I don’t make a lot of desserts. I actually didn’t make this one either. I was having a nap after putting Gordie to bed and when I woke up my husband had made this for us and even took pictures so I could blog about it. And if that isn’t love, I don’t know what is.

Print
Sometimes Food Tastes Like Love: Chocolate Peanut Butter Marshmallow Pitas
 
Ingredients
  • 2 whole wheat pitas
  • 1 handful of mini marshmellows
  • 1 small handful of chocolate chips
  • 2 (ish) tbsp of peanut butter
Instructions
  1. Spread peanut butter down the centre of the pitas. Top with marshmallows and chocolate chips.
  2. Fold the pitas over and grill for about 5 minutes in your indoor grill. Alternatively you could bake them in the oven or cook them in a non-stick frying pan. The insides should be melty and squishy when ready.
3.2.2925


Chocolate Peanut Butter Marshmallow Pitas  Chocolate Peanut Butter Marshmallow Pitas

Chocolate Peanut Butter Marshmallow Pitas

These were really sweet and really messy. A nice quick treat that would be great to make with the kids too.

Filed Under: desserts and treats, Food, Recipes Tagged With: dessert

Chocolate Hazelnut Hummus

April 21, 2011 by danawyyc 1 Comment

Hazelnut butter is the only nut butter that I’ve tried that might give peanut butter a run for it’s money. It’s just so good. So it was almost inevitable that my hummus experimentation would end with Nutella inspired hazelnut hummus. It was way better than the peanut butter hummus. I ended up leaving it a little chunkier than I usually do with hummus which gave it a really nutty feel. I ate the whole batch with apples for dipping (over a few days of course!) And I didn’t even share. Yes, it is that good.

Hazelnut butter is not as easy to find as peanut butter or even almond butter. In the superstore by my house you can find it in the aisle with the organic food, soy, and gluten free products. Not in the peanut butter and jam aisle.

Chocolate Hazelnut Hummus

Print
Chocolate Hazelnut Hummus
 
Ingredients
  • 1 can (16 oz) Chickpeas ; rinsed and drained
  • 4 Tbsp Hazelnut butter or 2 TBSP hazelnut butter and 2 Tbsp peanut butter (I just used a big spoon – more if desired)
  • ½ teaspoon Sea salt
  • 1 teaspoon vanilla
  • ¼ cup cocoa powder
  • 4 Tbsp maple syrup (you can adjust this to taste (2-8 Tbsp)
  • ½- 3/4 cup Water (depending on the texture desired)
Instructions
  1. Drain and rinse the chickpeas.
  2. Add all the ingredients to the food processor (you can use a blender, but it’s not really not as effective. I have tried and don’t recommend it. I ended up buying a food processor so I could make hummus).
  3. Run the food processor until the hummus starts to appear to bounce up and down (this won’t take a really long time) . Alternatively just check it every 10 seconds or so. You’ll want to scrape off the sides of the food processor because I find some chickpeas tend to stick to the sides and then give it another quick blend. If you are finding it’s not as well mixed or creamy as you would like just add another ¼ cup of water.
  4. Serving Ideas With apple slices, as a sandwich spread, sauce on a dessert pizza, on crackers, with pita
3.2.2925


Filed Under: Appetizers, Cooking with kids, desserts and treats, Food, Recipes, Snacks

Primary Sidebar

About Me

I'm an experiential playground expert and mom to three young kids. I live with my husband in Calgary, Alberta, Canada. When I'm not looking after people, I'm reading all the YA fiction I can get my hands on and am attempting to learn photography. My laundry-folding suffers due to more interesting pursuits.

You can also find me over at:
12 Great Salads to Take to a Potluck or Feed a Big Group - talkinginallcaps.com

11 Great Salads to Take to a Potluck or Feed a Big Group

Sriracha tomato soup - easy meals - talkinginallcaps.com

12 Easy Meals That are Great for One or Two (or more!)

Asian Lentil and Mango Salad 3

Salad #49 – Asian Lentil and Mango Salad

Kale, Quinoa and Black Bean Salad

Salad #42 – Kale, Quinoa and Black Bean Salad

Disneyland Photography Tips - 11 Tips for Getting Great Photos Your Family Will Treasure

Disneyland Photography Tips – 11 Tips for Getting Great Photos of Your Disneyland Vacation

11 Tips for Taking a Toddler and a Preschooler to Disneyland

Categories

Archives

Footer

Copyright © 2025 · Foodie Pro Theme by Shay Bocks · Built on the Genesis Framework · Powered by WordPress