Google+ talkinginallcaps@gmail.com
  • Skip to primary navigation
  • Skip to main content
  • Skip to primary sidebar
  • Skip to footer

Talking in ALL CAPS

  • Food
    • 52 Salads Recipe Index
    • 52 Soups Recipe Index
  • Photography
  • Travel
    • Travel
    • US National Parks
    • Washington DC
    • Disneyland
  • Thoughts
    • Thoughts
    • Motherhood
    • Parenting
  • Calgary
  • About Me

Side Dish

Baby Smashed Potatoes

February 6, 2011 by danawyyc 3 Comments

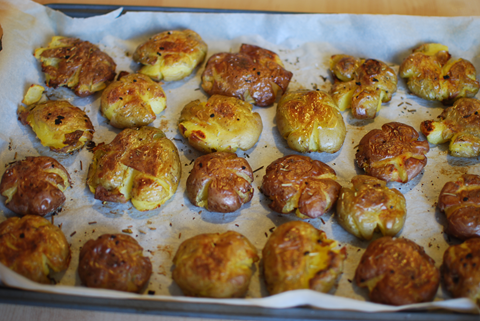
I’m starting to think that just about every vegetable should be roasted at 400F for 30-60 minutes with a little bit of olive oil and salt and pepper. This is now my third recipe in a row that follows this logic. You’d have to really hate potatoes to not like these. I liked these so much I made them for Christmas dinner last year – there wasn’t a single one left over!. They also provide a lot more nutrients than a lot of potato dishes because you leave the skins on. They take a little bit more time than some methods, because they are boiled and then baked but the result is amazing. If you want, you can boil and smash the potatoes ahead of time just refrigerate until you are ready to use them.

Baby Smashed Potatoes

Print
Baby Smashed Potatoes
Recipe type: Side Dish
 
Ingredients
  • 2-2.5 lbs baby potatoes
  • 2 TBSP oilve oil
  • salt, pepper and rosemary (I use dried but I’m sure fresh would be lovely)
  • 2 garlic cloves minced (shortcut – buy pre-minced, look in the refrigerated section by the salads as they are much better than the shelf stable variety you get by the spices)
  • ore it hits the heat. Squishing the potatoes is also pretty fun.
  • The kids can:
  • put the potatoes in the pot
  • squash the cooled potatoes
  • .paint the potatoes with olive oil
  • flip the potatoes
  • sprinkle the salt, pepper and rosemary
  • Directions
Instructions
  1. Put the potatoes in a pot and cover with cold water. Bring to a boil and simmer for 10 minutes.
  2. When the potatoes are tender, drain the pot and let the potatoes cool (if you are in a hurry you can grab the potatoes with a tea towel and smash them while they are still hot).
  3. Preheat the oven to 400F
  4. Get a (clean!) tea towel and put it on the counter. Place the potato on top. Fold the tea towel over and press down on the potato with your palm.
  5. Place the smashed potatoes on a baking tray.
  6. Brush each potato with olive oil and sprinkle with salt and pepper.
  7. Flip the potatoes and repeat on the other side.
  8. Add a couple pieces of minced garlic to each potato and sprinkle with rosemary.
  9. Put the tray in the over and flip the potatoes after 15 minutes. Continue to bake for 15-20 minutes more. When they are done the skins of the potatoes will be brown and crispy but the centre will be soft.
3.2.2925

Baby Smashed Potatoes

Leftovers can be eaten cold straight from the fridge or reheated in the oven or toaster oven.


Filed Under: Food, Recipes, Side Dishes, Vegan, Vegetarian

Roasted Butternut Squash

February 5, 2011 by danawyyc Leave a Comment

I took another crack at the butternut squash today. It turned out quite a bit better than the last time. I think the problem before was that the squash wasn’t as fresh as it needed to be. Not that it was bad, it just didn’t have the right consistency anymore – it was a little too mushy around the edges. So if you (like I usually do) buy pre-cut cubes (Costco’s are great) make sure you get the furthest away best before date and check to make sure they are nice and firm when you go to cook them. If they’re not, maybe make soup instead.

This isn’t the lowest calorie vegetable dish you can make but it’s a crowd pleaser and makes a nice side dish for special occasion dinners (or just for snacking!) Unless your kids are going through a really picky stage, they’ll like this dish. And you will like making it! The prep work is minimal and once it’s in the oven you don’t have to do a thing.

Roasted Butternut Squash

Print
Roasted Butternut Squash
Recipe type: Side Dish
 
Ingredients
  • 2 lbs butternut squash cubes (shortcut – buy pre-cubed)
  • 2 TBSP oilve oil
  • ¼ cup shredded Parmesan Cheese (or white cheese blend)
  • 1 tsp salt
  • 0.5 tsp pepper
  • 2 garlic cloves minced and 2 Tbsp parsley chopped (both optional)
Instructions
  1. Preheat oven to 400F.
  2. Put all ingredients into a large resealable plastic bag and combine (you can also mix in a bowl).
  3. Spread evenly on a single layer on a shallow baking dish. I've found that lining a cookie tray with parchment paper works really well. The cubes pop right off. Whatever you do, don't put them directly on the cookie tray – trust me it will never be the same.
  4. Cook for 40-50 minutes. The edges should be carmelized and golden. You can flip one of the cubes over to check the bottom, but otherwise leave them alone.
Notes
Based on <a href="http://allrecipes.com/Recipe/Garlicky-Baked-Butternut-Squash/Detail.aspx">Garlicky Baked Butternut Sqush</a>
3.2.1290

I completely forgot the garlic, but they were still great. Adding the parsley makes for a nicer presentation, but I was all out.

If you have leftovers, you can mash up the cooked squash with some pasta water to thin it out and use it as a pasta sauce.

Filed Under: Cooking with kids, Food, Recipes, Side Dishes, Vegetarian

Making Icky Food Good: Roasted Brussels Sprouts

February 4, 2011 by danawyyc 2 Comments

My mother-in-law is a big fan of Brussels sprouts and they are chalk full of vitamins but she wasn’t making any converts at home. I figure that just about anything can be appealing if you cook it the right way, so I set out to find something that everyone would enjoy. This is what I came up with.

Making Icky Food Good: Roasted Brussels Sprouts

Print
Making Icky Food Good: Roasted Brussels Sprouts
Recipe type: Side Dish
 
Ingredients
  • 1.5 pounds Brussels sprouts (shortcut - buy prewashed and bagged)
  • 1.5 tablespoons oilve oil
  • 1 teaspoon salt (do not skip the salt, you need it to counteract the bitterness of the sprouts)
  • 0.5 teaspoon pepper
Instructions
  1. Preheat oven to 375F (you can do 400 if you are in a hurry but you'll need to watch it near the end)
  2. Wash and trim the Brussels Sprouts if necessary. Cut each Brussels sprout in half.
  3. Place the Brussels Sprouts, olive oil, salt and pepper in a resealable plastic bag. Seal it up and mix well. (Obviously you could also use a bowl if you'd rather).
  4. Put the Brussels spouts on a baking tray and bake for 40-50 minutes. Turn them every 7-10 minutes so they cook evenly and don't char.
  5. When they are finished they should have a nice brown color but still have some green visible. The loose leaves may be blackened but nothing else should be.
3.2.1290

Roasted Brussels Sprouts - talkinginallcaps.com

If you have leftovers you can put them in a container in the fridge and eat then reheated in the oven/toaster oven or I actually like the leftovers cold, straight from the fridge. They store best if you let them cool down to room temperature first.

You could lighten the recipe up by using a cooking spray or olive oil mister to coat the Brussels Sprouts instead of the olive oil.


Filed Under: Food, Recipes, Side Dishes, Vegan, Vegetarian

Primary Sidebar

About Me

I'm an experiential playground expert and mom to three young kids. I live with my husband in Calgary, Alberta, Canada. When I'm not looking after people, I'm reading all the YA fiction I can get my hands on and am attempting to learn photography. My laundry-folding suffers due to more interesting pursuits.

You can also find me over at:
12 Great Salads to Take to a Potluck or Feed a Big Group - talkinginallcaps.com

11 Great Salads to Take to a Potluck or Feed a Big Group

Sriracha tomato soup - easy meals - talkinginallcaps.com

12 Easy Meals That are Great for One or Two (or more!)

Asian Lentil and Mango Salad 3

Salad #49 – Asian Lentil and Mango Salad

Kale, Quinoa and Black Bean Salad

Salad #42 – Kale, Quinoa and Black Bean Salad

Disneyland Photography Tips - 11 Tips for Getting Great Photos Your Family Will Treasure

Disneyland Photography Tips – 11 Tips for Getting Great Photos of Your Disneyland Vacation

11 Tips for Taking a Toddler and a Preschooler to Disneyland

Categories

Archives

Footer

Copyright © 2025 · Foodie Pro Theme by Shay Bocks · Built on the Genesis Framework · Powered by WordPress