Google+ talkinginallcaps@gmail.com
  • Skip to primary navigation
  • Skip to main content
  • Skip to primary sidebar
  • Skip to footer

Talking in ALL CAPS

  • Food
    • 52 Salads Recipe Index
    • 52 Soups Recipe Index
  • Photography
  • Travel
    • Travel
    • US National Parks
    • Washington DC
    • Disneyland
  • Thoughts
    • Thoughts
    • Motherhood
    • Parenting
  • Calgary
  • About Me

Recipes

Chocolate Peanut Butter Hummus

March 26, 2011 by danawyyc 2 Comments

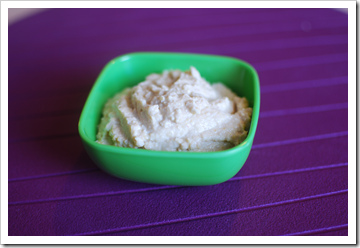
After making peanut butter hummus I started to wonder if you could make a sweet hummus dish instead of the traditional savory hummus. A peek around the internet proved that this was indeed possible so I decided to give it a try. Now some of the sites I visited suggested that this could be an actual dessert. I’m still not sold on that. What I made would not really be good as an ice cream topping for instance, and if I were to add enough sugar and fat to make it that way, I’d rather just go for broke and use caramel sauce.

Instead I would suggest using it as a Nutella alternative. Or as a way to try to get your kids to try beans. Sort of a gate way food for beans.  Overall, it wasn’t bad, people who tried it generally liked it, but I don’t think I’m going to have to make a new batch every week.

I’ve give a wide range for the maple syrup because it’s so easy to adjust to taste as you can just add more in and pulse the food processor for a few more seconds. We found that the cocoa came out more with less maple syrup, but it is definitely sweeter with more.

Print
Chocolate Peanut Butter Hummus
 
Ingredients
  • 1 can (16 oz) Chickpeas ; rinsed and drained
  • 4 Tbsp Peanut Butter (I just used a big spoon – more if desired)
  • ½ teaspoon Sea salt
  • 1 teaspoon vanilla
  • ¼ cup cocoa powder
  • 2-8 Tbsp maple syrup
  • ¼ cup Water (more if needed)
Instructions
  1. Drain and rinse the chickpeas
  2. Add all the ingredients to the food processor (you can use a blender, but it’s not really not as effective. I have tried and don’t recommend it. I ended up buying a food processor so I could make hummus).
  3. Run the food processor until the hummus starts to appear to bounce up and down (this won’t take a really long time) . Alternatively just check it every 10 seconds or so. You’ll want to scrape off the sides of the food processor because I find some chickpeas tend to stick to the sides and then give it another quick blend. If you are finding it’s not as well mixed or creamy as you would like just add another ¼ cup of water.
3.2.2925

image
imageimage

Cooking with the Kids
The kids can:

  • Measure and pour the ingredients
  • Rinse the chickpeas and put them in the food processor
  • Run the food processor (with supervision)

Serving Ideas With apple slices, as a sandwich spread, sauce on a dessert pizza, on crackers, with pita

Filed Under: Appetizers, Cooking with kids, Food, Recipes, Snacks

Lentils and Ground Beef–Tired Mom Meal

March 25, 2011 by danawyyc Leave a Comment

Today I had a truly terrible sleep. My special needs brother had insomnia in addition to being agitated and anxious. This is not a winning combination. He tossed and turned and complained all night waking me up along with him.

Despite this bad start I was still going to go ahead with my plans to make cranberry turkey burgers. All I’d have to do was a little chopping and I was basically good to go. But the turkey was still really frozen. I seriously considered getting my husband bring home take out. I was just done.

Then I remembered Lentils and Ground Beef. My mother-in-law made it for my husband while he was growing up, but I had never had it before he introduced me to it. Now I make it fairly frequently. If you have cooked ground beef in the freezer, it couldn’t be easier. It’s not the most attractive dish, but it’s simple, quick and high in fibre, protein and iron.

image


Print
Lentils and Ground Beef–Tired Mom Meal
 
Ingredients
  • 1 can lentils
  • .5-1 lb of cooked ground beef. (really any amount is fine)
Instructions
  1. Defrost the ground beef in the freezer (or cook and drain it in a pan).
  2. Add the can of lentils with the liquid and the defrosted ground beef to a pan.
  3. Cook on a low heat until there is no longer liquid in the bottom of the pan. If you need it quicker you can use a higher heat, but you’ll need to watch it and stir it more often.
  4. When it’s done, put the heat down to the lowest setting and it will be ready when you are.
3.2.2925

Serve it with a salad, in a wrap, with a side of bread or some onion rings. I usually just eat it out of a bowl by itself.

image

Filed Under: Beef, Easy Meals, Food, Recipes

Peanut Butter Hummus

March 18, 2011 by danawyyc Leave a Comment

Print
Peanut Butter Hummus
 
Ingredients
  • ¼ teaspoon Garlic powder
  • ¼ cup Lemon juice
  • ¼ cup Water (more if needed)
  • 1 can (16 oz) Chickpeas ; rinsed and drained
  • 4 Tbsp Peanut Butter (I just used a big spoon)
  • 1 teaspoon Sea salt
Instructions
  1. Drain and rinse the chickpeas.
  2. Add all the ingredients to the food processor (you can use a blender, but it’s not really  not as effective. I have tried and don’t recommend it. I ended up buying a food processor so I could make hummus).
  3. Run the food processor until the hummus starts to appear to bounce up and down (this won’t take a really long time) . Alternatively just check it every 10 seconds or so. You’ll want to scrape off the sides of the food processor because I find some chickpeas tend to stick to the sides and then give it another quick blend. If you are finding it’s not as well mixed or creamy as you would like just add another ¼ cup of water.
3.2.2925

It’s funny how much how something is presented can change your attitude towards it. I’ve seen recipes for hummus that suggested you could substitute tahini with peanut butter on multiple occasions and I always thought that was kind of lame. Okay if you lived somewhere that you really couldn’t find any tahini, fine but otherwise?
Then one day my mom sent me a recipe for peanut butter hummus. Peanut butter hummus? Brilliant! Now I realize that this is actually the same thing that I previously thought was lame, but somehow now it sounds interesting and different instead of a cop out.
It’s pretty good too. The peanut butter taste isn’t overpowering but if your kid is a little adverse to hummus, this may be enough to win them over.
image
image
Cooking with the Kids
The kids can:

  • Measure and pour the ingredients
  • Rinse the chickpeas and put them in the food processor
  • Run the food processor (with supervision)

image
Per 1/8 of the hummus: Calories – 81, Carbs – 7g, Fat – 5g, Protein 4, Fibre – 2

Filed Under: Appetizers, Cooking with kids, Food, Recipes, Snacks, Vegan, Vegetarian

Salt and Pepper Popcorn

March 17, 2011 by danawyyc Leave a Comment

Air popped popcorn can be a great healthy snack, but a little… bland. I love salt and pepper potato chips so I decided to try to bring those flavors to the popcorn. It is super easy, delicious and really pretty healthy.

image

Directions
1. Pop your popcorn using your favorite method.
2. Spray or drizzle with oil or butter and sprinkle with salt and pepper.

I really like using extra virgin olive oil in my misto sprayer and grinding pepper and sea salt over top. It’s best to spray and sprinkle, toss and then repeat a few times.

Filed Under: Food, Recipes, Snacks, Vegan, Vegetarian

Curry Gnocchi – Vegetarian

March 14, 2011 by danawyyc Leave a Comment

Gordie was helping me pick out ingredients from the pantry and figured we should have Gnocchi. And then decided that he wanted chickpeas too. I was a little thrown. I usually just serve Gnocchi with a tomato pasta sauce. So I poked around the internet and that that some people combined these two ingredients with canned tomatoes. That was definitely something I could work with. When I run out of canned tomatoes I sometimes feel like I’ve lost the ability to cook. I decided to add some chopped spinach I had in the freezer which reminded me of an Indian dish so I added some currry spices. Gordie is a little iffy on the spinach (and green food in general at the moment) but loved everything else. The dish I made was a pretty mild curry without too much heat but you could always add more if you were so inclined.image

Print
Curry Gnocchi - Vegetarian
 
Ingredients
  • 1 tablespoon olive oil
  • 1 large can diced tomatoes
  • 1 can chickpeas (rinsed and drained)
  • 1 block of chopped frozen spinach
  • 1 package of Gnocchi
  • 1 tablespoon curry powder
  • 1 tablespoon Garam Masala (an indian spice mix, you can get it here in Calgary in Superstore in the Indian spice section – not the baking aisle)
  • If you can’t find or don’t want to buy Garam Masala just use twice the curry powder.
Instructions
  1. Heat some oil in a pan. Mix in the spices, tomatoes and chickpeas. You can basically cook this for as long as you want on a low simmer. I’d recommend at least 10-15 minutes.
  2. When you are about 10 minutes from serving, put a pot of water on to boil. Add the Gnocchi to the boiling water. After a few minutes the gnocchi will float to the top. Use a slotted spoon to scoop the floating gnocchi into a bowl (it would also be fine to put them directly into the pan with the tomatoes and chickpeas).
  3. Defrost the spinach in the microwave. As soon as it has thawed, squeeze the water out of it. The spinach will look the best if you add it to the pan close to when you plan on serving it but it will still taste fine if it cooks for a while.
  4. Cook the spinach, tomatoes and chickpeas until the spinach is heated.
3.2.2925


image
Cooking with the Kids
The kids can:

  • Pour the cans into the pan
  • Measure and pour the spices
  • Stir the vegetables under close supervision

image
Per 1/4 of the Curry Gnocchi: Calories – 316, Carbs – 56g, Fat – 6g, Protein 12, Fibre – 7.

Filed Under: Cooking with kids, Easy Meals, Food, Recipes, Vegetarian

Carrot Cake Oatmeal–Slow Cooker Method

March 13, 2011 by danawyyc 1 Comment

Carrot Cake Oatmeal - Slow Cooker Method

I got the inspiration for this dish from Oh She Glows (great vegan recipe ideas). I thought the concept would be perfect for the slow cooker and simplified it so it would be easier for me to throw together before bed.

I’m really pleased with how it turned out. I would definitely recommend adding a little maple syrup (or your favorite sugar like substance) on top because that really takes it from good oatmeal to carrot cake. My husband liked it even though he always complains whenever I use pecans or walnuts. Gordie seemed to like it too even though it often rejects carrots recently. They didn’t bother him at all in this. Bottom line – I will definitely be making it again because I loved it.

Print
Carrot Cake Oatmeal–Slow Cooker Method
Recipe type: Breakfast
 
Ingredients
  • 1 Cup Steel Cut Oats
  • 2 Cups Water
  • 2½ Cups Milk (I’ve tried skim and soy – both good)
  • 2 cups of carrots finely grated (2-3 good sized carrots, I have used a coarse grate and it was fine, just not as good)
  • 1 Tsp Cinnamon
  • ½ tsp ground ginger
  • ¼ tsp ground nutmeg
  • 1 tsp vanilla extract
  • ¼ cup walnuts/pecans (I always substitute pecans, I find them less bitter)
  • ¼ cup raisins
  • top with milk and maple syrup
  • I think a little cream cheese mixed in would be great, but I haven’t had a chance to try it.
Instructions
  1. Place the first 8 ingredients in a crock pot and stir to combine.
  2. Cook the oatmeal on “warm” for 6-9 hours (If I put it on low overnight half of it sticks to the side of the crockpot, you may be able to put yours on low overnight if yours doesn’t run quite as hot as mine. If you don’t have a warm setting reduce the cooking time or just deal with it).
  3. When you get up, pop in the raisins and walnuts.and turn the heat up to low. Cook for 20-30 more minutes and serve with milk and maple syrup.
3.2.1290


Photography Note: It is hard to take appealing pictures of goopy things. Toppings really help make it look more attractive.

Filed Under: Crockpot, Easy Meals, Food, Recipes, Vegetarian

Loving Leftovers: Pasta Frittata

March 12, 2011 by danawyyc Leave a Comment

One of the things that I’m trying to focus on lately is throwing out less leftovers. Often I find that I just can’t handle eating the same meal that I may have already had for supper and lunch again for the following supper. So I’m trying to find ways of mixing it up to make something that feels fresh but doesn’t involve a lot of additional work.

One of my favourites is making a leftover pasta frittata. It works with any type of pasta and with or without meat. It’s best if you have a sauce with a bit of substance, but if all you have is plain pasta or a weak sauce like olive oil and parmesan you can still make it work. If this is the case, I’d recommend starting the frittata by sautéing an onion and some garlic to bump up the flavour or just add a few additional fresh items like fresh herbs (basil is nice), more tomatoes, or peppers and it’ll be great.
image

Print
Loving Leftovers: Pasta Frittata
Recipe type: Easy Meal
 
Ingredients
  • About 1 cup of leftover pasta plus sauce
  • 7-8 eggs
  • ¾ cup grape tomatoes halved
  • 1 cup shredded cheese
  • salt and pepper
  • 2 Tbsp extra virgin olive oil
Instructions
  1. Preheat the oven to 350F.
  2. Beat the eggs and mix in the tomatoes, cheese, salt and pepper.
  3. In a large oven proof skillet, heat the olive oil over medium heat. Add the pasta and sauce and heat for 1 minute.
  4. Evenly distribute the pasta in the pan. 5. Pour the eggs over the pasta and coat as well as you can. 6. Sprinkle the eggs with salt and pepper. 7. Cook over medium heat for 4-6 minutes. The frittata should be mostly set but the top will still be runny. 8. Place the pan in the oven for 4-6 minutes until the eggs are set.
  5. If you don't have an oven proof skillet, you can use a lid to set the top of the eggs or you can slide the frittata onto a plate and then flip back into the pan to cook the other side but you’ll have to cook it longer on the first side.
3.2.1290

image
I seem to always have more than a cup of leftover pasta and have trouble resisting adding the extra. This will still work, but it won’t be as ‘eggy’ and it may alter the cooking time.

Filed Under: Easy Meals, Food, Recipes

My Favorite Basic Hummus Recipe

March 11, 2011 by danawyyc Leave a Comment

I’m going to try out a few different hummus variations in the next couple of weeks, so I thought I’d first share my go-to hummus recipe. There’s about a million different hummus recipes out there but I do really love this one. I prefer the powdered garlic to fresh garlic as it gives it a more mellow flavor. I also strongly recommend making it a day ahead. The flavors have a chance to mix and the bitterness of the tahini (which I am a little sensitive to) is gone after a night in the fridge.

image

Print
My Favorite Basic Hummus Recipe
Recipe type: Dip
 
Ingredients
  • ¼ teaspoon Garlic powder
  • ¼ cup Lemon juice
  • ¼ cup Water (more if needed)
  • 1 can (16 oz) Chickpeas ; rinsed and drained
  • ½ cup Tahini
  • 1 teaspoon Sea salt
Instructions
  1. Drain and rinse the chickpeas.
  2. Add all the ingredients to the food processor (you can use a blender, but it’s not really not as effective. I have tried and don’t recommend it. I ended up buying a food processor so I could make hummus).
  3. Run the food processor until the hummus starts to appear to bounce up and down (this won’t take a really long time) . Alternatively just check it every 10 seconds or so. You’ll want to scrape off the sides of the food processor because I find some chickpeas tend to stick to the sides and then give it another quick blend. If you are finding it’s not as well mixed or creamy as you would like just add another ¼ cup of water.
3.2.2925

My favorite basic hummus recipe

I find this makes quite a lot of hummus so I usually freeze half. It freezes really well.


Filed Under: Appetizers, Food, Recipes, Snacks, Vegan, Vegetarian

Avocado, Grapefruit and Spinach Salad

March 7, 2011 by danawyyc Leave a Comment

I threw this salad together from things I happened to have in the fridge. It turned out so well and looks so pretty I now pull it out when I want an impressive looking salad that’s quick to put together when I’m entertaining. Although most of the time I make it just for myself.

Avocado, Grapefruit and Spinach Salad

Print
Avocado, Grapefruit and Spinach Salad
Recipe type: Salad
 
Ingredients
  • 1 bag of baby spinach leaves
  • 1 grapefruit segmented (or a grapefruit fruit cup which are awesome)
  • 1 avocado
  • almonds (sliced for sprinkling)
  • ⅛ cup grapefruit juice
  • 1 Tbsp extra virgin olive oil
  • 1 Tbsp balsamic vinegar
  • salt and pepper (freshly ground is nice)
Instructions
  1. Whisk together the dressing ingredients: grapefruit juice, olive oil, balsamic vinegar, salt and pepper.
  2. Cube the avocado (and slice the grapefruit if necessary).
  3. Put the spinach in a large salad bowl and toss with the dressing. You will probably have made more than you need so go easy.
  4. Top with the avocado, grapefruit and almonds and serve.
3.2.1290

Avocado, Grapefruit and Spinach Salad Recipe

Filed Under: Food, Recipes, Salads, Vegan, Vegetarian

7-11 Lasagna – Mexican Lasagne Recipe

February 28, 2011 by danawyyc Leave a Comment

This recipe was inspired by a joke cookbook that my husband and I got for our wedding called Mini Mart a la Carte. The cookbook’s premise is recipes that you can make while shopping only at a convenience store. In general, the recipes are things that I (or most anyone else) would not even dream of making, but the one for “Lowrider Lasagna” actually looked pretty good. I tweaked it a little and the result is below. It’s a big hit at my house and it’s something I can whip up even if I don’t have a lot of time to cook or badly need groceries.

7-11 Lasagna - Mexican Lasagne Recipe

Print
7-11 Lasagna – Mexican Lasagna Recipe
Recipe type: Easy Meal
 
Ingredients
  • 1 can refried beans (I like the ones with green chiles you could also use pinto beans)
  • 1 large can diced tomatoes drained
  • 1 cup frozen corn (or a can of corn)
  • 1 cup shredded cheese
  • 6 whole wheat tortillas
Instructions
  1. Preheat the oven to 350F.
  2. Rip half the tortillas into pieces so they cover the bottom of the baking dish. Any size is fine. I usually do 2 whole tortillas and then rip a third into a few pieces to fill the gaps. Spread half of the refried beans on half of the tortillas and arrange half in a lightly greased 9x13 inch baking dish to cover the bottom. Top evenly with half each of the corn, tomatoes and cheese.
  3. Cover the rest of the tortillas with the remaining refried beans and layer on top and cover with the rest of the corn, tomatoes and cheese
  4. Cover with aluminum foil and bake for 30 minutes. Remove the foil and continue to bake until the cheese begins to brown, about 15 minutes longer.
3.2.1290

7-11 Lasagna - Mexican Lasagne Recipe

Filed Under: Easy Meals, Food, Recipes, Vegetarian

« Previous Page
Next Page »

Primary Sidebar

About Me

I'm an experiential playground expert and mom to three young kids. I live with my husband in Calgary, Alberta, Canada. When I'm not looking after people, I'm reading all the YA fiction I can get my hands on and am attempting to learn photography. My laundry-folding suffers due to more interesting pursuits.

You can also find me over at:
12 Great Salads to Take to a Potluck or Feed a Big Group - talkinginallcaps.com

11 Great Salads to Take to a Potluck or Feed a Big Group

Sriracha tomato soup - easy meals - talkinginallcaps.com

12 Easy Meals That are Great for One or Two (or more!)

Asian Lentil and Mango Salad 3

Salad #49 – Asian Lentil and Mango Salad

Kale, Quinoa and Black Bean Salad

Salad #42 – Kale, Quinoa and Black Bean Salad

Disneyland Photography Tips - 11 Tips for Getting Great Photos Your Family Will Treasure

Disneyland Photography Tips – 11 Tips for Getting Great Photos of Your Disneyland Vacation

11 Tips for Taking a Toddler and a Preschooler to Disneyland

Categories

Archives

Footer

Copyright © 2025 · Foodie Pro Theme by Shay Bocks · Built on the Genesis Framework · Powered by WordPress