Google+ talkinginallcaps@gmail.com
  • Skip to primary navigation
  • Skip to main content
  • Skip to primary sidebar
  • Skip to footer

Talking in ALL CAPS

  • Food
    • 52 Salads Recipe Index
    • 52 Soups Recipe Index
  • Photography
  • Travel
    • Travel
    • US National Parks
    • Washington DC
    • Disneyland
  • Thoughts
    • Thoughts
    • Motherhood
    • Parenting
  • Calgary
  • About Me

danawyyc

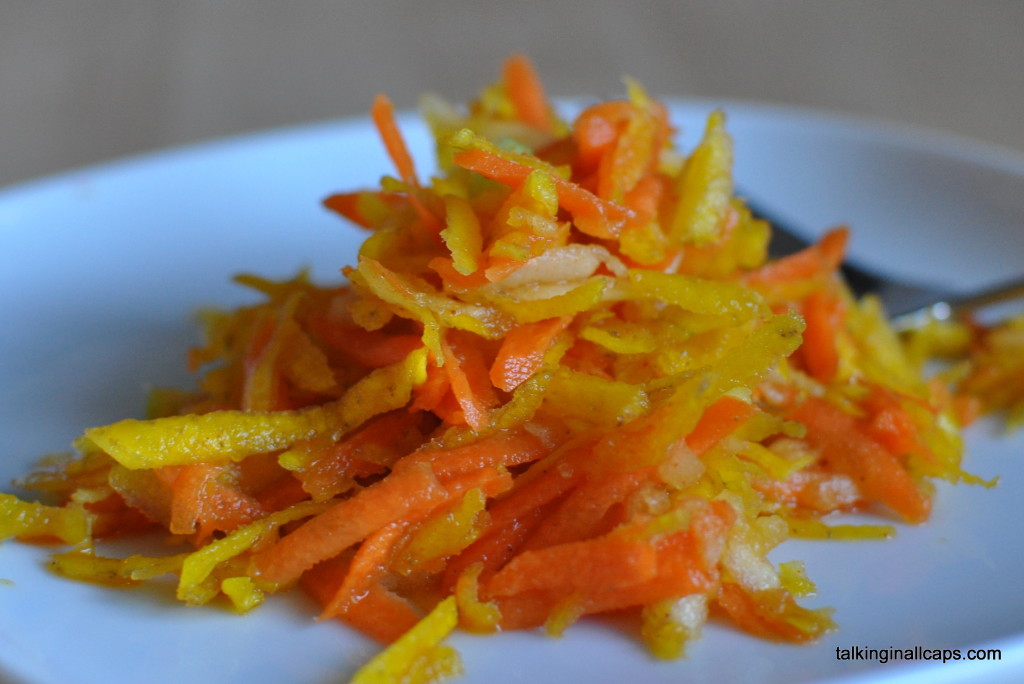
Salad #2 Shredded Yellow Beet, Carrot and Apple Salad with Orange Ginger Dressing

January 29, 2013 by danawyyc 3 Comments

For our second salad I went in search of something to use the yellow beets that I had gotten from Eagle Creek Farm’s Winter CSA. Winter is not the easiest time to create a seasonal salad, but there is still quite a bit you can work with, beets included.

I came across a couple recipes for shredded beet salads. Now I’m no stranger to beets. I grew up on pickled beets and grew and roasted beets when I had my very first garden. But I had absolutely no idea that you could shred beets and eat them raw. At first I had thought this would fall into the category of, you can but would you want to (sort of like raw chicken, yeah, you can eat it raw but…).

But in fact when they are shredded they are very similar to the carrots. And yes, you can also use purple beets.

Shredded Yellow Beet, Carrot and Apple Salad with Ginger Orange Dressing Recipe

(adapted from Simply Recipes Morrocan Beet Salad)

Shredded Yellow Beet, Carrot and Apple Salad with Ginger Orange Dressing

Print
Salad #2 Shredded Yellow Beet, Carrot and Apple Salad with Orange Ginger Dressing
Recipe type: Salad
 
Ingredients
  • 1 large beet
  • 2 large carrots
  • 1 apple (I like granny smith)
  • Orange Ginger Dressing
  • ½ teaspoon paprika
  • ¼ teaspoon ground cumin
  • ¼ teaspoon ground ginger
  • pinch of salt
  • pinch of cayenne
  • juice of 1 orange
  • 2 tbsp honey
Instructions
  1. Peel and shred the carrots, beets and apples (the apple will also need to be cored). The beet will shred better if you cut it into smaller pieces first, think steak fries. If you have some kind of kitchen gadget to shred things, that would be handy. Put everything you've shredded into a large bowl.
  2. Add the ingredients for your dressing into a small bowl and blend well.
  3. Pour the dressing over your salad ingredients and mix. You will end up with quite a bit of dressing. You can use it all, it doesn't hurt for the salad to marinate in the fridge a little, and it can keep it from drying out or you can just add what you need if you are using it right away.
3.2.1290

Alternatives:

  • If you are keeping it for a while you may want to use raisins instead of the apple, it’ll still taste fine, but the color goes a bit off over time.
  • You could also make the dressing as simply recipes did with lemon juice instead of orange juice and cinnamon instead of ginger
  • If you have a baby under 12 months you may want to substitute the honey for corn syrup, rogers golden syrup or maple syrup (I forgot so didn’t give it to Nicky).

Did they eat it?

Gordie (3.5 years): Tried some of the shredded vegetables before I put the dressing on it and made it into a salad.

Stephen: “Good. Cool and refreshing.”

Dana: I liked this salad. It was a real surprise as I didn’t expect much. It was pretty heavy on the ginger, I might reduce it if I was going to make it again. 2 down 51 to go.
Filed Under: 52 Salads, Food, Recipes, Salads, Side Dishes, Vegan, Vegetarian Tagged With: winter salad

Salad #1 – Roasted Sweet Potato and Cranberry Salad Recipe – 52 Salads

January 22, 2013 by danawyyc 7 Comments

I’ve decided to embark on a challenge to make 52 different salads over the next 52 weeks. I was inspired by my friend Misty’s 52 cakes challenge and my friend Jenny’s 52 cookies challenge. They sounded like so much fun I decided to do one of my own. But 52 weeks of cookies and cakes was not going to help me with my fitness goals for this year, so I’m going to do 52 salads instead.

I love salads, but I often find myself too lazy and disorganized to actually make them. I’m going to use this challenge to help me get in the habit of making salads and getting my family to eat more vegetables.

Additionally, my three year old son Gordie turns his nose up at anything labeled a salad so I’m going to try to see if I can win him over and
get him to try some salads.

For this challenge I am going to try to:

  • Make really different salads rather than subtle variations
  • Use a variety of sources for inspiration
  • Use seasonally available ingredients
  • Focus on salads with lots of vegetables that would work as a snack or side dish and will keep a few days in the fridge.

At least for the time being I’ll also be choosing salads that are dairy free as Nicky is sensitive to dairy products.

I’m taking suggestions so if you have a favorite salad that I should try please let me know!

Now onto our first salad:

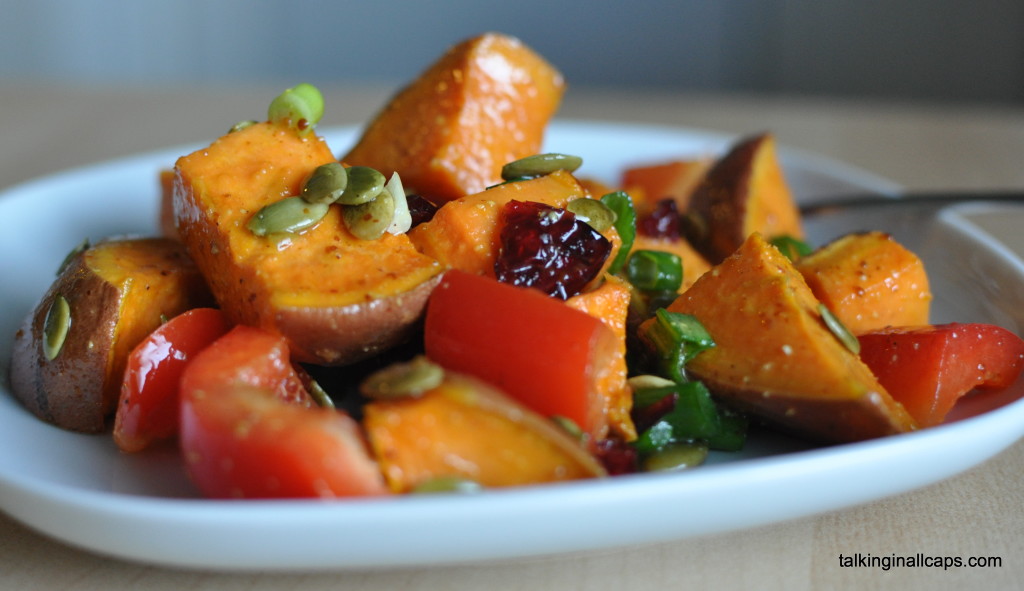
This salad was inspired by one that they make at Sunterra Market. They use green peppers which is quite pretty but the ones at the store when I went were all squishy. That’s one of the things that’s so great about making salads, a recipe is really only a guideline.

Roasted Sweet Potato and Cranberry Salad

Roasted Sweet Potato and Cranberry Salad

Print
Salad #1 – Roasted Sweet Potato and Cranberry Salad Recipe – 52 Salads
Recipe type: Salad
 
Ingredients
  • 1 large sweet potato cubed and roasted
  • 1-2 red or green peppers chopped
  • 1-2 green onion sliced
  • handful of dried cranberries
  • handful of pumpkin seeds
  • Maple Dijon Dressing
  • ¼ cup extra virgin olive oil
  • 1 Tbsp maple syrup
  • 1 tsp dijon mustard
  • 2 tsp white wine vinegar (or red wine or just white vinegar)
  • salt and pepper
Instructions
  1. Mix the salad ingredients in a large bowl. Whisk, blend of shake the dressing ingredients together until they are well mixed. Use your hands to cover the salad with the dressing. You will probably have a bit more than you really need.
  2. Note: When you are roasting the sweet potatoes test them often, you want them to be cooked but not mushy or they will just fall apart in the salad.
3.2.1290

Did they eat it?

Gordie (3.5 years): Did not try it because it is a salad even though I presented him with just a piece of sweet potato

Nicky (10 months): Loved it, sweet potato and red peppers were a huge hit

Stephen: “Good. Doesn’t really seem like a salad though.”

Dana: I adore this salad. I would absolutely make it again. Aside from having to roast the sweet potatoes it’s super easy to throw together too.

So there you have it – 1 down 51 to go.

Filed Under: 52 Salads, Food, Recipes, Salads, Side Dishes, Vegan, Vegetarian Tagged With: fall salad, salad, winter salad

Sleep: My biggest parenting challenge so far

January 21, 2013 by danawyyc 2 Comments

DSC_0671I used to take sleep for granted. I would sometimes stay up too late reading a good book  but in general I just went to bed when I was tired and got up in the morning when I needed to start my day. I don’t handle poor sleep well, so in general, I just avoided not getting enough.

I’ve never stayed up all night without sleeping. Part of me is still convinced that if I did stay up all night tomorrow might not come.One time when I was about 17 I only got 3 or so hours of sleep. The next day, I ended up getting a huge migraine complete with a migraine aura (I saw a huge geometric shape) that dissolved and then when I looked into the mirror I couldn’t see the middle section of my face. Then I went to bed.

I am not designed to party all night.

Now with two kids, I crave sleep. I day dream about taking a sleepcation, where I drop the kids off and I go to a hotel and just sleep. Sometimes I can feel the desire for sleep deep in my bones. It’s like a soul crushing ache.

Although this is not hyperbole, it’s no longer this bad all the time. Nicole is 10 months old now and most of the time she’s a pretty good sleeper. She goes down well for her naps and generally at bed time too. She still wakes up to nurse a couple times even on a good night, but I can handle that.

But like any baby she has bad nights too. Nights where she falls asleep before she’s really finished nursing while teething and so wakes up after half an hour and then doesn’t go back to sleep until 10, or 11 or even 12. Nights where she wakes up every hour and nights where she is a wake for an hour or two in the middle of the night.

It’s almost harder now than when she was a newborn because now I expect to be able to have some time to myself in the evenings and to not have extended periods of wakefulness during the night.

It was easier with one kid, if I had a bad night, then I could just nap during the day, but it’s not so easy to get a nap in when you have two kids. I feel guiltier too. When I’m a lousy mom to the kid who kept me up all night, I feel like it’s at least a situation that they created. But When Nicole keeps me up all night, Gordie gets a crappy mom the next day too.

At least know I do know now that it will get better with consistent routines and doing my best to help Nicole have healthy sleep habits. I’m also more prepared to adjust my behavior when she changes her patterns.

I know that I’ll get back to a place where my daydreams centre on something other than sleep. I’ve also learned something else. I used to have trouble napping, unless I was really really sick. But I’ve learned the secret – you just need to be chronically and consistently sleep deprived. Works like a charm.

Filed Under: Motherhood, Thoughts Tagged With: sleep

Eating Well and Losing Weight has Nothing to do with What You’re Not Eating

January 12, 2013 by danawyyc 1 Comment

I’m a far from perfect eater, and am definitely not as active as I should be, but weight loss has not been a major issue in my life. Pregnancy for most, and certainly for me, made weight gain and having to deal with weight loss inevitable.

When Nicole was 2 months old she was puking so much my doctor suggested I try going off dairy to see if it helped. (This is actually a pretty uncommon reason, but my son had a dairy sensitivity too. For most babies puking is not cause for concern and dairy is not the reason for the puking.)

Although I can’t say this made my day I thought that at least it would make it easier to lose the remaining baby weight. But it didn’t. After two months of not eating anything that had more than a ‘may contain dairy’ on the label, my weight had basically not changed. There was so many things that I wasn’t eating, cheese, lasagna, all kinds of desserts, most items at a buffet or pot luck, but that didn’t make a difference.

Because it’s not what you’re not eating that’s important. There are lots of ways to eat poorly without eating dairy, or sugar, or gluten or fat or whatever else you’re giving up. Cutting out dairy made me reach for more nuts and have more toast. And although there are fewer options, there are still plenty of desserts and sweets you can eat too. Having a restricted diet made it harder for me to make good choices because I simply had less to choose from.

If cutting something out of your diet helps you eat more fruits and vegetables and other healthy foods then it might help you lose weight. But that’s really what’s important,what you are eating.

Filed Under: Food

Surprisingly Easy Sponge Toffee Recipe–Dairy Free

January 10, 2013 by danawyyc 3 Comments

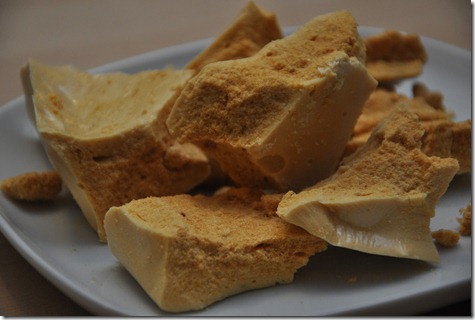
Surprisingly Easy Sponge Toffee Recipe

One day my husband suggested we try to make sponge toffee (think the inside of a crunchie bar. Neither of us had much experience making candy and we expected the process to be difficult.

Nothing could be further from the truth. It’s easy and quick to make and dairy free to boot. It’s also a pretty impressive looking science experiment to do with the kids. The candy is too hot for little kids to help with during the reaction, but older kids will love helping and younger kids will still be impressed.

Print
Surprisingly Easy Sponge Toffee Recipe–Dairy Free
 
Ingredients
  • 2.5 cups sugar
  • ⅔ cup corn syrup
  • ⅓ cup water
  • 4 tsp baking soda
  • 2 tsp vanilla
Instructions
  1. Grease and line a metal cake pan we used wax paper, but greased parchment paper is often recommended. (Do not be tempted to use a glass pan, you want something that has some bend to it).
  2. Get your baking soda and vanilla ready.
  3. Stir sugar, corn syrup and water in a 12 cup pot over medium heat until sugar dissolves.
  4. Put in a candy thermometer. Do not stir while you wait for it to come to a boil.
  5. When the temperature reaches 300F (hard crack stage) remove it from heat.
  6. Quickly whisk in the baking soda. This will cause the mixture to bubble up (you’ll want your kids who are not actively helping to stay back – it’s hot!)
  7. Whisk in the vanilla.
  8. Immediately pour into the prepared pan. Let it cool in the pan for about 2 hours. The mixture may be kind of uneven on top but resist the urge to smooth it out, that will pop the air bubbles.
  9. Break it into pieces and enjoy!
3.2.2925

Filed Under: desserts and treats, Food, Recipes, Vegan, Vegetarian Tagged With: dessert, treats

How to Take Photos of Kids in Front of the Christmas Tree

December 20, 2012 by danawyyc 5 Comments

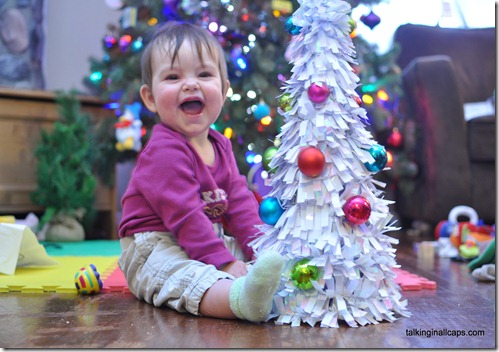
Taking great pictures of your kids by the Christmas tree can be challenging. This week I tried to figure out how to take better pictures of my kids in front of our Christmas tree. I’ve put together some tips and things to try to get the kind of photos you want.

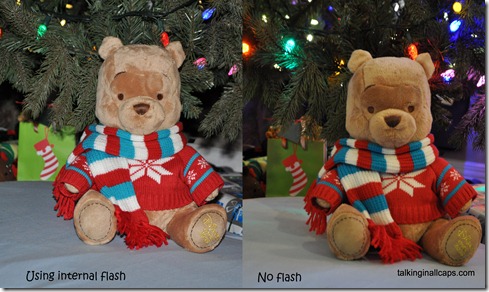
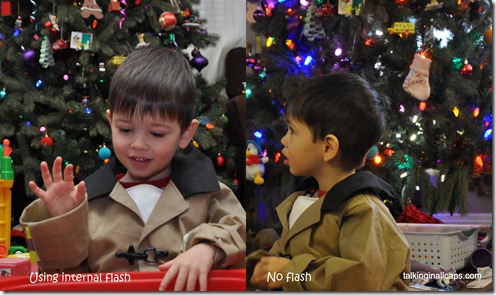
1. Turn off Your Camera’s Flash

No matter what kind of camera you have, and what your lighting conditions are, nothing will take the magic out of your Christmas tree photos more than using your camera’s built in flash.


kids and Christmas Trees

Christmas - Pre - 2012

2. Pay attention to the Background and Foreground of your Photo

No matter how good your photo is, it’s still going to look like crap if there’s a bunch of junk cluttering it up. (Like in the photo above…)

Clear a Path
At least clear a path.

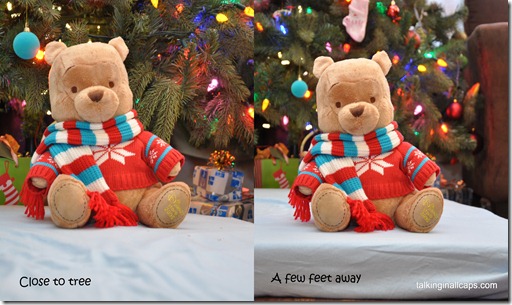
3. Practice First With a Doll or Stuffed Animal

Stuffed animals are much more patient subjects than children. Be sure that you have an idea of what you want to do before you involve your kids. You’re probably still going to have to make some adjustments. Kids move around a lot more than inanimate objects so you may have to increase your ISO and reduce your shutter speed (more on that on point 10) but at least you’ll have a starting point.

more christmas pics
You’re going to have a limited timeframe so you might as well make them count.

4. Keep Your Camera Steady

Unless your room is really well lit, you’re probably going to be dealing with a lower light setting. To get a good exposure you’re likely going to have to use longer shutter speeds (so your camera takes a longer time to take the picture) This is going to make it important to keep your camera steady so that you’re not getting movement from camera shake. If you do capture any movement, it’s better for it to be because your kid is moving not you.

If you have one, you can use a tripod, but you can also use the ground, a stack of books, a table etc. You may also want to consider a remote for your camera (surprisingly affordable) or the timer on your camera (probably only useful if you can get your kids to stay still-ish).
Keep Camera Steady
I’m pretty sure that tree is not actually moving.

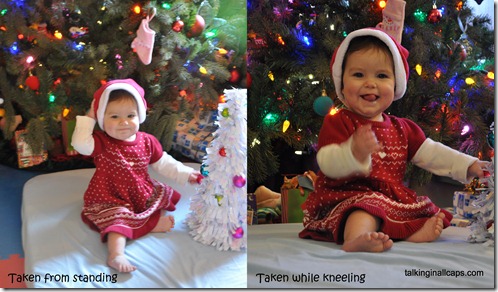
5. Shoot Low to the Ground

If you have small kids you may even want to lie on the ground to get a better angle.
more christmas pics3

6. Put Your Kid a Few Feet in Front of the Tree

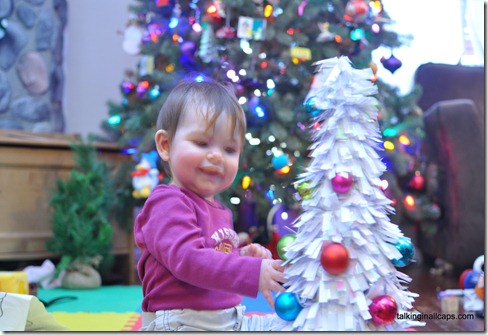
It’s natural to want to put your kid right in front of the tree but you’ll typically have better shots if you move them a few feet away. You’ll be able to see more of the lights on your tree and you’ll be able to manipulate the aperture to blur the background if you want to.
more christmas pics2

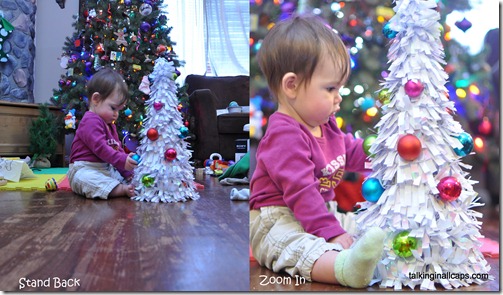
7. Stand Back and Zoom in

Another good strategy is to also increase the distance between you and your child. If you’re farther away, you’ll be able to zoom in which will blur the background which is great for portraits and give the Christmas lights a pretty look.

Christmas - Pre - 20121

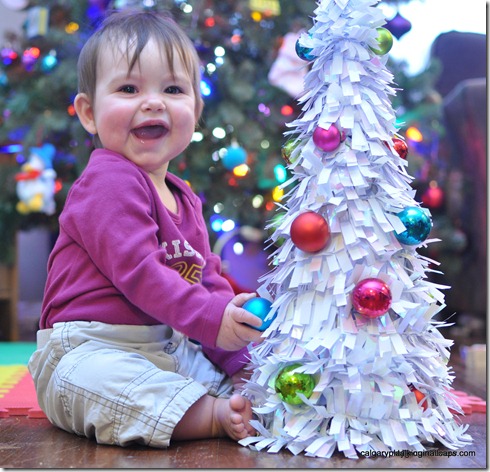
8. Use Something to Help Keep your Kid From Moving Around

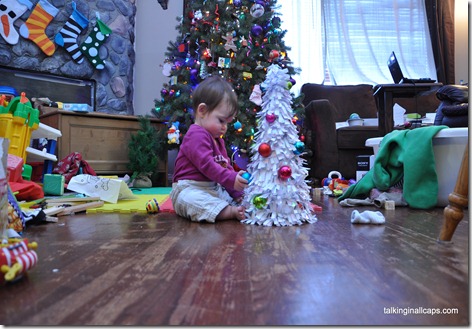
This is important for two reasons – 1. to keep the tree in the background and 2. to reduce motion blur. For older kids, bribery can be a good tactic,, younger kids may benefit from a mark on the floor for where you want them to be. For babies, your best best is going to be an unfamiliar object that you don’t mind being in your shots.

use something to keep still
This tree was the perfect distraction.

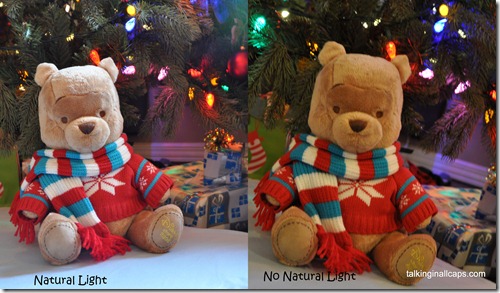
9. Try to Light up Your Kid’s Face

Depending on the lighting in your house and how much your kids move around, you may want more light to get a good shot. One thing you can try is getting some natural light on your kids face. I tried this below, but my tree is too big for me to move around and my window is right beside the tree making it difficult to get the tree in the background and the sunlight on my child’s face.
more christmas pics1-001
natural light
This does give a interesting look.

The other option, and the one that will give you the most consistent success, is to use an external flash with the flash pointed at a wall or ceiling. This will light up your child without taking away the beauty of your tree.

With Flash
Taken with external flash pointed at the wall.

10. Pick Your Camera Settings

Using the above strategies, you may be able to get great pictures just putting your camera on the no flash setting.

If you have a DSLR and want to play around here’s what I found helpful:

  1. Set your camera to Shutter priority. This will let you manipulate how long light is allowed to hit the sensor. A longer shutter speed will tend to make your christmas lights look prettier but it will also capture more movement from your kids.
  2. Set your ISO and shutter speed. You want as low an ISO as you can get away with and the longest shutter speed.
  3. You’ll probably want to start with an ISO of at least 400 and may need to bump it up to upwards of 1600 if your kid is moving around a lot.
  4. Start with a shutter speed of about 1/2 a second. If you’re getting good pictures try lengthening the shutter speed, if you are getting blurry pictures decrease it.
  5. Play around with the ISO and shutter speed settings. Increasing the ISO will allow you to use a longer exposure (longer shutter speed). (For more depth on how these are inter-related you can see my post on How to choose what professional mode to use).

DSC_0079
It’s not the sharpest image but at least she’s not blurry. Here I had to bump up the ISO to 1600 to get a good image.

A few more of my favorite shots:
DSC_0071

stand back and zoom in

flash

DSC_0115-001
Not what I was trying to do, but kind of interesting.


Note: Aside from cropping the above images were not digitally manipulated.

Sources used for this article:

http://www.augustteaphotography.com/taking-pictures-of-your-christmas-tree/

http://www.sarahcblog.com/2011/11/how-to-photograph-kids-in-front-of-the-christmas-tree/

http://faithfulstepsphotography.blogspot.ca/2011/12/photographing-kids-in-in-front-of.html

http://ashleyannphotography.com/blog/2008/12/04/photo-tip-christmas-tree-pics/

Filed Under: photography Tagged With: Christmas, tutorial

6 Bedtime Adventure Books: Top Kids Books Tested

December 8, 2012 by danawyyc Leave a Comment

Some of the most beloved children’s books feature kids who have adventures at bedtime. Although not bedtime books that lull kids into sleep, they do give going to bed seem a little bit magical – like anything could happen. We tried out 6 books that were listed in at least one top 100 kids books lists (you can find the list at the bottom of the post).

1. Where The Wild Things Are

The story of a boy who being so wild, his mother sent him to bed without supper, went on a wild adventure and then decided that perhaps home wasn’t so bad after all. This book ends up near the top of many lists of great kids books and it’s on our as well. Gordie and I have loved reading this book together. It’s a strange little book but the idea of being ‘king of the wild things’ instead of scared of the monsters is captivating.

2. Cloudy With a Chance of Meatballs

This book is a little wordier than the others on this list. All the food for the citizens of Chewandswallow come raining down from the sky which is a great system until the food starts becoming more than the town can handle. This book is ridiculously silly and will be loved by preschoolers and younger school children. This book was a little long for Gordie (aged 3) but we still recommend it.

3. Harold and the Purple Crayon

Harold goes on an imaginative adventure armed with his purple crayon to help him on his way. The drawings in this book are simple but captivating. I originally found this book by looking at top 100 kids books lists. I have loved reading this book to Gordie and he loves hearing it again and again. This book inspired him to try to draw his own crayon adventures.

4. In The Night Kitchen

A truly strange little book like a dream come to life, this book features Mickey who goes on a fantastic adventure in the Night Kitchen. I found this book to be a little too ridiculous for me but Gordie was kind of captivated and asked me to read it a few times.

5. Owl Moon

Unlike the other books we reviewed this week, this book features a real adventure that takes place at what would normally be bed time. This book has a lovely rhythm and tells the story of a father and child going out owling (owl spotting). This is a nice little story but not gripping for my 3 year old boy.

6. There’s a Nightmare in My Closet

The story of a boy who have a monster in his closet. When he confronts the monster, it starts to cry and the boy ends up bringing him into bed with him. This is a kind of cute story to read your kid if they are having trouble going to sleep at night because of nightmares and monsters. It turns the idea of the scary monster upside down and may help your kid feel a little less scared. Gordie thought this books was kind of interesting and it wasn’t a long read, but I didn’t really like the illustrations.

Our Favorite Tried and Tested Books Preschool Bedtime Books :
  1. Where The Wild Things Are
  2. Cloudy With a Chance of Meatballs
  3. Harold and the Purple Crayon


Book Lists

Children’s Book Guide top 100 Children’s Books:
Where the Wild Things Are, Cloudy with a Chance of Meatballs, Harold and the Purple Crayon, In The Night Kitchen

Babble’s top 100 kids books:
None!

Teachers First 100 Best Books:
Where the Wild Things Are
Kern Country Library 100 Picture Books Every Child Should Know:
Where the Wild Things Are, Harold and the Purple Crayon, There’s a Nightmare in My Closet

New York Public Library 100 Picture Books Every Child Should Know:
Where the Wild Things Are, Harold and the Purple Crayon, Owl Moon

Goodreads Best Children’s Books (top 300):
Where the Wild Things Are, Cloudy with a Chance of Meatballs, Harold and the Purple Crayon, In The Night Kitchen, Owl Moon

Filed Under: Best Kids Books

How to Take Better Photos With Santa (and How Not to)

December 1, 2012 by danawyyc 8 Comments

bettersantaphotos-001

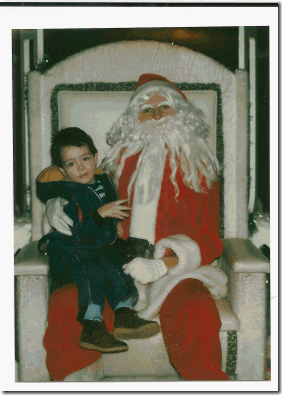
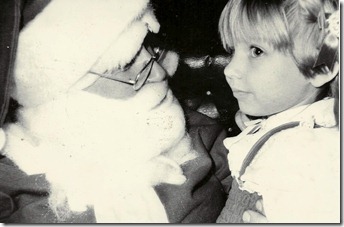
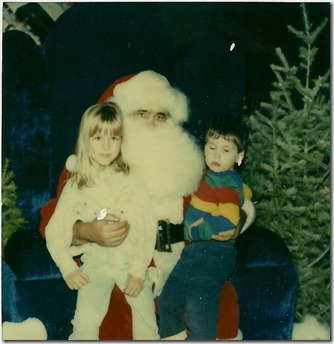
Even though my oldest is only 3, I have quite a bit of experience taking small kids to see Santa. Partly for my blog post where I talk about what it’s like to take photos with Santa at different  malls in Calgary and partly because I think it is just plain fun. My friends and family have kindly supplied me with some photos to round out my own to help you get better photos with Santa this year.

1. Prepare Your Kids Ahead of Time

Read your kids stories about Santa, show them movies with Santa (if you can find one with their favorite character, even better) and show your kids pictures of them or other family members with Santa to familiarize them.

566336_10151312554677040_337526886_nUnless the photos looked like this.

It can also be worthwhile to seek out a Santa that is more natural looking and inline with their expectations.

603961_372686899487334_671224799_nIf you wouldn’t sit on that lap, why would you put your child on it?

2. Dress for the Occasion

Even if you’re going to get a free photo, consider what your kids are wearing.

131559_112148458855831_5035859_oThis shirt of Gordie’s is really cute, but doesn’t look great in a Christmas photo.

IMG_0080
This may be going a little too far.

S S At the very least, take off your kids’ coats!

You may also want to consider what you’re wearing that day… just in case.

image_1354210759337049If you look closely you can see Santa at the back.

3. Use a Partner

Especially if you are taking the photos yourself, bring someone with you so they can help you position and distract the kids to help keep them from freaking out.

Crying with SantaFreaking out.

4. Try Backing In

If you have a really little kid, try holding them facing you and backing them into Santa, keeping their attention on you. Then back away and quickly take the picture.

gordie with santa0001[2]Sometimes this works.

Lola- Eff you Santa! 2011
Sometimes, not so much

5. Time it Right

Arrive a bit early so your kids can see Santa from a distance before it’s their turn. Make sure they are not tired or hungry. Bring a snack just in case. Weekday mornings and evenings are usually quieter time to visit. Whatever you do, don’t go when your child would normally be napping.

DSC_0074
Not a good time.

6. Give Them Some Moral Support

Having a friend, sibling or even a favorite toy may be all your kid needs to feel comfortable and stay focused.

396652_10151165250754639_428035946_nWorked like a charm.

7. Be Flexible

You may be able to get a better picture by not trying to force a smile.

gordie and santa 20100001[2]That’s a pretty cute pout.

You may also want to consider letting your kids stand beside Santa instead of on his lap.

53308_10150347928425173_5766155_oSanta may be holding him back, but they are all in the picture.

8. Make use of Some Photography Tips

If you are taking the photo yourself, try setting the white balance to match the lighting (florescent or incandescent bulbs). Or you can adjust that on your computer afterwards.

baby Dana and santaWas 1982 really this yellow?

If the room isn’t very bright, bump up the ISO and hold the camera steady (close to your body, try to kneel or set the camera on something to use as a makeshift tripod). Also double check that your camera is focusing on your child instead of the background.

photo (53)That tree looks great!

Position yourself so you can see your child’s face even if they are not looking directly at you.

newspaper santaCandid shots often show your child at their best.

Don’t forget to take multiple pictures.

blink santa
So this isn’t the only photo you go home with.

9. Try Again

If your child is hesitant to see Santa the first time, don’t be afraid to go back (again) later in the day or on another day all together.

DSC_0827
The first try.

DSC_0837
Again after lunch.

10. If All Else Fails…

You can always take a family photo near Santa instead. Most malls have a Christmas display that would make a great backdrop.

704653_10152311427910173_1395289379_oThis is the best ‘Santa’ photo this family has taken.

Or you could just take a picture of Santa!

just santaEven if Santa looks a little confused.

11. Laugh it Off

Sometimes, even if you end up with a picture that wasn’t what you wanted, it can still end up being a treasured part of your family history.

67889_10152287758050397_782823760_nThat year’s Christmas card

As funny as some of these photos are, I hope this post helps your family get great photos with Santa this year. And if your pictures don’t go as planned you can always send them to me for next year’s post.

Have a Merry Christmas!

Dana Wheatley

What are your tips for taking better photos with Santa?

If you have a not-so-good photo with Santa you’d like to share, you can e-mail it to talkinginallcaps@gmail.com.

Are you from Calgary? Check out my website about the best indoor and outdoor places to take your kids –> http://www.calgaryplaygroundreview.com

Photos used with permission

Filed Under: photography Tagged With: Christmas, Santa

Professional Camera Modes: How to Decide Which Professional Exposure Mode to Use

November 27, 2012 by danawyyc 3 Comments

Learning to Use my DSLR – Practical Photography Tutorials

When I wrote my first photography post on taking better pictures of your kids in the snow, I realized that I didn’t know how to choose which professional mode to use. This seems to be a pretty fundamental gap in knowledge so I decided I should figure it out.

It became clear pretty quickly that understanding what exposure is would be a good first step. I won’t go into a lot of detail – hopefully just enough.

Put simply, exposure is how much light is falling on your camera’s image sensor (in the past it would be how much light fell on your film). To get a clear, crisp image you don’t want too much light (overexposed) or too little light (underexposed) landing on your sensor.

Three related factors impact what your exposure will be: ISO, Aperture and Shutter Speed. To get a good exposure these three factors have to be balanced correctly and making changes to one will necessitate making changes to one or both of the other factors.

ISO – This is how sensitive your camera’s sensor is to light. With film cameras, you had different film ‘speeds’ that you had to change if you wanted a different level of sensitivity. For digital cameras you can change the ISO just by manipulating your camera’s settings. The higher the ISO number, the more sensitive your sensor will be to light. This means you don’t need as much light for a good exposure but the image quality is reduced when your sensor is more sensitive.

Eg.
If you are outside on a sunny day, you may want your ISO to be as low as 100.
If you are inside you may want your ISO to be 400 (more sensitive due to less ambient light).
If you are taking a low light photograph you may need to set your ISO to a very high number. (your image will be more grainy but at least you can get the shot).

In general, you want to set your ISO to the lowest number you can to get the best image quality but to get a good exposure, you need to increase the ISO in lower light settings.
DSC_0126

By bumping up the ISO to 1600, I was able to get this photo of Nicole is a very dark room.

DSC_0126-001

When you zoom in on the picture you can see the trade off of using the high ISO – although the exposure is pretty good, there is more noise resulting in image that is grainy.

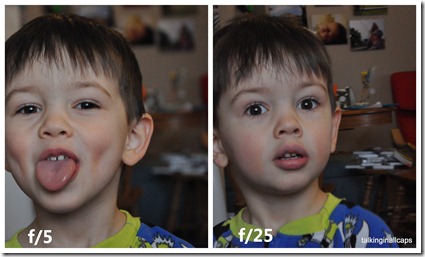
Aperture (or f-stop) – this is how much light passes through your lens at once. A larger aperture will result in more light passing through and a smaller aperture will result in less light passing through. Manipulating the aperture also effects the depth of field (how much of your image is in focus).

Eg.
To get a good exposure outside on a sunny day, you would need a narrower aperture such as f/22.
To get a good exposure in a low light setting you may need an aperture such as f/4.

2012-11-29

In these pictures I manipulated the aperture. You can see how it also changed the depth of field. In the photo on the right the background is quite blurry and the focus is just on Gordie. In the photo on the right the background is more in focus and pretty distracting.

Shutter Speed – This is how long light is allowed to hit the sensor. The shorter your shutter speed, the less light will hit the sensor. The longer the shutter speed the more motion you will capture as well.

Eg.
On a sunny day you may want a short shutter speed of 1/4000.
In a low light setting you may want to capture light for a longer period of time using a shutter speed of 1/60.

DSC_0465

Here’s an example of a long shutter speed with a moving subject. Although in this instance it was not what I had intended, it can be an interesting effect. Kids move so fast it can be helpful to shorten the shutter speed to help photograph them without motion blur.

These three factors are inter-related, so when you change one you may need to change one or more of the others to get a good exposure. For non-professional photographers like myself (and I’m assuming you if you’re reading this) it can be helpful to let your camera make some of the decisions while you manipulate the one you are most interested in. Picking the right professional exposure mode can help you do this.

P – Program Mode:

This mode would be perfect if you want to make some manipulations but have your camera do most of the heavy lifting. In this mode you can change things like the white balance, exposure compensation, ISO, and metering. This would have been perfect for me to use for my post on taking better pictures of your kids in the snow (I used the Aperture Priority Mode instead). I wasn’t trying to change the aperture or shutter speed. This can also be a helpful mode if you are going to be taking photos in a variety of lighting conditions.

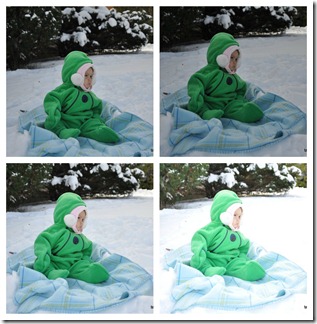
SnowPicCollage

In these pictures I was only manipulating the exposure compensation, to brighten up the snow. That would be a great use of Program Mode.

A – Aperture Priority Mode

In this mode, you manipulate your camera’s aperture while your camera handles the rest of the exposure settings. This will allow you to change the depth of field or how much of your photo is in focus. This is particularly great for photographs so your subject is in focus but the background is blurred. You can also use it to make sure that everything in your shot is in focus. You would likely want this mode while photographing landscapes, portraits, architecture, close up photography (think food or flowers) and wildlife.

S – Shutter Priority Mode

This mode is similar to Aperture Priority mode but in this case, you manipulate the shutter speed while your camera handles the rest of the exposure settings. This mode is best to use when your subject is in motion. You can use it freeze the action by setting it to be quick or to show motion by leaving it longer. You would probably want to use this mode if movement was a big aspect of your subject or the photo effect you want. This can also be highly useful for photographing kids!

M – Manual Mode

In this mode, you have the most control, but it’s also the hardest to use. At this stage of my photography I don’t want to use this mode and if you’re reading this I’m assuming you don’t either!

A Word About Scene Modes

Your camera will probably also have a number of pre-set Scene modes. There’s absolutely nothing wrong with trying them out too. Those modes use all the same principles I discussed above – pre-selected to try to create the best exposure for that kind of setting. Eg. the night mode will use a wide aperture to let in a lot of light at once and a longer shutter time, the action mode will use a quick shutter speed. There’s nothing those pre-sets can do that you shouldn’t be able to do yourself.

Learn Along Assignments:

1. Experiment with ISO

  1. Take your camera into a setting with not much light.
  2. Put it into Program Mode
  3. Set your ISO to a really high setting (like 1600)
  4. Try taking a picture. (Make sure you are keeping your camera steady)
  5. Now set your ISO to a lower number (like 400).
  6. Compare your results

2. Experiment with Shutter Speed

  1. Pick an subject that is moving. (Like your kids!)
  2. Put your camera into Shutter Priority Mode
  3. Try taking pictures at different shutter speeds
  4. Compare your results

3. Experiment with Aperture

Note: this is the hardest one to play around with. My camera will let me set my aperture to settings that don’t work well with my lens. I will be doing a tutorial on using the aperture setting in the near future.

If you would like to play around with it before that here’s what I recommend:

  1. Set your camera to Aperture Mode.
  2. Somewhere on your lens it will say something like 1:3.5-5.6G. Start by setting your aperture to within these numbers to start.
  3. Select an subject that is in front of a busy background. Making sure there is some distance between your subject and the background will make it easier to see the effect.
  4. Take photos with different aperture settings.
  5. Compare your results

4. Let me know how it went!


Resources Used for this article:

http://digital-photography-school.com/iso-settings

Nikon D3200 From Snapshots to Great Shots by Rob Sylvanc

Filed Under: photography

The Second Time Around

November 25, 2012 by danawyyc Leave a Comment

When I was pregnant with my 2nd child I worried, okay about a lot of things. Which is not too far from normal for me. But one of the things I worried about is whether everything would feel like it had already been done.

Would I be excited when she rolled over for the first time? Would her first steps be all over facebook?

She’s now 8 months and many of her first milestones have already come and gone.

I was just as excited when she rolled over.  I could not have been more proud seeing her learn to crawl or pull herself up for the first time. I’m no longer worried that my excitement will be less because she’s not my first. Because they are still her firsts. And those firsts are exciting.

But it is different. With two kids, I’m more distracted and thDSC_0318ere’s less down time. I have to put in more of an effort to write things down in her baby book and it will in all likelihood have much less written in it than her older brother’s. And more of her firsts will probably not get photographed or written up in a status update. So one day, it may look to her that I was less excited. But even if one day she feels that way, I know it’s not true.

There was one aspect of having a second child that did surprise me though. I know they’ll fight and bicker (believe me that has already started!) but I was really surprised with how much they love each other already and how young Nicole was when they started playing together. They are three years apart – I had expected it to be a long time before they would really connect. But I was really wrong about that. Gordie loves to make her laugh and already they entertain each other. Nicole’s favorite thing to play with is whatever Gordie’s playing with. She’ll chase him down the hall and cry when he leaves the room. Sure sometimes it drives Gordie bonkers when he wants to play with his toys and she’s right there trying to play with him but he adores her too. It’s hard to resist someone who loves you so much.

It’s not always easy having two little kids. In fact it often isn’t. It’s a very challenging time period. But seeing your babies develop into their own people with their own personalities is one of the most exciting things there is.

Filed Under: Motherhood, Thoughts

« Previous Page
Next Page »

Primary Sidebar

About Me

I'm an experiential playground expert and mom to three young kids. I live with my husband in Calgary, Alberta, Canada. When I'm not looking after people, I'm reading all the YA fiction I can get my hands on and am attempting to learn photography. My laundry-folding suffers due to more interesting pursuits.

You can also find me over at:
12 Great Salads to Take to a Potluck or Feed a Big Group - talkinginallcaps.com

11 Great Salads to Take to a Potluck or Feed a Big Group

Sriracha tomato soup - easy meals - talkinginallcaps.com

12 Easy Meals That are Great for One or Two (or more!)

Asian Lentil and Mango Salad 3

Salad #49 – Asian Lentil and Mango Salad

Kale, Quinoa and Black Bean Salad

Salad #42 – Kale, Quinoa and Black Bean Salad

Disneyland Photography Tips - 11 Tips for Getting Great Photos Your Family Will Treasure

Disneyland Photography Tips – 11 Tips for Getting Great Photos of Your Disneyland Vacation

11 Tips for Taking a Toddler and a Preschooler to Disneyland

Categories

Archives

Footer

Copyright © 2025 · Foodie Pro Theme by Shay Bocks · Built on the Genesis Framework · Powered by WordPress